[ DOCS ] : OpenCBM Manual
Replicated, corrected and reformatted from https://opencbm.trikaliotis.net/ on 7/16/2025
1. Overview
Please read the section WARNINGS at the end of this document before proceeding. Improper use of the cable adapters (XA1541, XU1541, XUM1541) may damage your drives or the cables themselves.
The popular Commodore 8-bit home-computers like the C-64 and the VIC-20 are using a custom serial bus to talk to attached devices (disk drive, printer). This proprietary serial bus protocol is not natively supported by modern hard- or software.
OpenCBM provides an interface to this so-called IEC bus at the level of simple TALK and LISTEN commands, similar to the one provided by the Commodore kernel routines. Additionally, some higher and lower level bus control is available as well, allowing for full control of the bus.
The CBM serial devices are connected to the PC either to the parallel port via an XM1541 or XA1541 cable and, optionally, an XP1541 or XP1571 add-on cable. Alternatively, more modern USB cable solutions like XU1541 or XUM1541 (a.k.a. ZoomFloppy) are supported. For cables, cf. cable.
OpenCBM has a plugin concept which allows to additionally add custom build cables.
OpenCBM can be used on PCs on Linux, Windows and FreeBSD (all cables). Additionally, USB based cables are supported on Mac OS X.
1.1 Introduction to OpenCBM
This is version 0.4.99.104 of OpenCBM, a support package for retro devices that communicate with the serial CBM bus protocol, known from the C64, VIC-20, etc. Opencbm runs on Linux, Windows, FreeBSD and Mac OS X. OpenCBM 0.4.0 was a re-join of the two projects cbm4linux (latest standalone version: 0.3.2) and cbm4win (latest standalone version: 0.1.0a). It should be noted that both projects were highly related from the beginning, as cbm4win 0.1.0 was based on cbm4linux 0.3.2.
Opencbm should work with any devices that understand the “normal” talk and listen commands of the CBM IEC bus. It has been tested with several 1541, 1541-II, 1570, 1571 and 1581 drives, and a MPS-1200 printer. 1541 clones like the Oceanic OC-118 have also been reported to work.
The following cable types are supported:
- XUM1541 (OpenCBM version >= 0.4.99.xx)
- XU1541 (OpenCBM version >= 0.4.99.xx)
- XM1541 and XA1541 (cbm4linux version >= 0.2.1, cbm4win version >= 0.1.0)
- XP1541 (cbm4linux version >= 0.2.0, cbm4win version >= 0.1.0)
- XP1571 (cbm4linux version >= 0.2.4, cbm4win version >= 0.1.0)
- Modified XE1541 (only on Linux, obsoleted by the XM1541, see `opencbm/LINUX/config.make’)
More information on the different cable types can be found in cable.
This package is provided `as is’, no warranty of any kind will be taken for any damage or data loss caused by it or by any use of it.
*** WARNING *****************************************************
HOTPLUGGING can KILL your hardware.
Do not connect anything to the parallel port while the system or a drive is up.
Always SHUT DOWN, CONNECT, REBOOT.
Again, absolutely NO WARRANTY.
*****************************************************************
1.2 Supported operating systems
OpenCBM supports the following operating systems:
- For USB based cables: Any Linux, FreeBSD or MacOS X variant that support libusb-1.0 should be supported. Linux, FreeBSD and Mac OS X have been explicitly tested. For backward compatibility with older releases of OpenCBM, currently, also libusb-0.1 is supported. Note that this support will be dropped in some future version of OpenCBM.
- For parallel port based cables: Linux 5.x, 4.x, 3.x and 2.6 variants, FreeBSD 11.x and newer. Linux 2.0, 2.2 and 2.4 might still work, but have not been tested for ages. For Linux, i386 and AMD64 architectures are supported.
- For parallel port based as well as USB based cables: Windows NT 4.0, 2000, XP and Server 2003, Vista, 7 and 8. For USB based cables, NT 4.0 is not supported, though. The i386 architecture a.k.a “x86” (“32 bit”) is fully supported; additionally, 64 bit Windows (“x64”, “x86_64”) versions are supported. Itanium-based Windows (“iA64”) are
notsupported, though.
1.3 Supported CBM hardware
Currently, OpenCBM supports the following CBM devices:
- VIC 1541, VIC1540 (all variants, including clones)
- VIC 1570, VIC 1571 (including the 1571CR and the 1571 inside of a C128DCR)
- VIC 1581 (not with d64copy ( d64copy), not with cbmformat ( cbmformat) or cbmforng ( cbmforng))
- The IEC2IEEE ( http://www.nlq.de/) adapter
- other CBM IEC drives, printers, and compatibles (only with cbmctrl ( cbmctrl))
- VIC 8250, 8050, 4040, 2031, SFD 1001, and possibly other IEEE drives with an IEC to IEEE converter (for example, IEC2IEEE from Jochen Adler, cf. http://www.nlq.de/, or with a ZoomFloppy extension that lets you use IEEE devices directly.
1.4 Cables
Since the last OpenCBM release, the PC market has changed considerably. Modern PCs do not contain parallel ports anymore, nor do they have ISA type connectors for extension cards. Additionally, parallel port cards connected via PCI, PCIe or other modern replacements are reported not to work with OpenCBM.
Also, devices that allow you to connect your parallel port printer to the USB port of your PC cannot work, either.
Thus, there was a need for newer cable replacements. While OpenCBM still supports parallel port based cables, more modern USB variants are supported, too, and they should be preferred to the parallel port based ones.
USB cables
There are two types of USB cables currently supported. The XU1541 cable is a simple cable, optimised for ease of building and low costs. Its big downside is that transfers with this cable are very slow. In fact, the parallel port based solutions for the XA1541 or XM1541 (a.k.a. XAP1541 or XMP1541) were faster than the XU1541 cable. Thus, it can be recommended only if you do not plan to use the XU1541 regularly, but only for a limited time.
If you have the money to spend and plan to use your CBM equipment regularly, it is highly suggested to use a XUM1541 cable, for example, in the incarnation of the ZoomFloppy.
Building these cables is beyond the scope of this document. We refer to the appropriate links on the web for instrutions how to build or order them.
Parallel port based cables
As parallel ports more and more vanish from modern PC hardware, it is recommended not to use these cables for new projects, but to use USB based cables instead.
Another problem for Windows machines is that using such cables requires a kernel mode driver. For 64 bit Windows machines (with the exception of Win XP 64 bit), in order to load kernel mode drivers, these drivers have to be signed. Signing a driver not only costs money; it also requires you to have a company in order to get the needed certificate. Thus, the OpenCBM drivers currently are not signed, thus, you will not be able to use parallel port based cables with 64 bit versions of Windows.
This is not completely true, as you can switch off the driver signature enforcement in windows. Normally, this is used for driver development only. Use at your own risk! Instructions on disabling the driver signature enforcement can be found on the web.
These cables are still supported on 32 bit Windows variants, and they will remain as long as the developers have access to the necessary infrastructure.
Please note that USB-to-parallel converters that are designed to let you access your parallel port based printers on the PC will definitely not work! If your PC does not have a native parallel port, please consider using an XU1541 or XUM1541 cable instead!
Also note that a standard X(E)1541 cable won’t work with _this_ driver. In fact, there will probably never be a multitasking OS which works with one of these, that’s why we call it XM1541, M for Multitasking. Anyway, if you have a XE1541, the necessary modification is simple:
Exchange pins 5 & 6 on the Commodore DIN plug
The ACK line is the only line on a PC parallel port that can generate a hardware interrupt. This way, we get an interrupt when the device releases the DATA line to signal “ready to receive”. Without an interrupt, you would have to poll for this signal about every 100us, which is inacceptable for any multitasking system.
Be sure to have your parallel port configured to use an IRQ, usually 7 or 5, but both are often also used by soundcards.
(ASCII art taken from the StarCommander README :))
The PC parallel plug (male DB-25 connector):
        PaperEnd   Busy
    SelectIn   |   |   Ack        Data 7 - Data 0       Strobe
           |   |   |   |   +-------------+-------------+   |
           V   V   V   V   |                           |   V
        +------------------------------------------------------+
        | 13  12  11  10   9   8   7   6   5   4   3   2   1   |
        |  o   o   o   o   o   o   o   o   o   o   o   o   o   |
        +-+                                                  +-+
          |  o   o   o   o   o   o   o   o   o   o   o   o   |
          | 25  24  23  22  21  20  19  18  17  16  15  14   |
          +--------------------------------------------------+
             |                           |   ^   ^   ^   ^
             +-------------+-------------+   |   |   |   |
                        Ground          Select   |   |   AutoFeed
                                              Init   Error
The Commodore drive serial bus plug (male 6-pin DIN connector) looks like:
                                 Reset
                                   |
                                   V
                          +-------+ +-------+
                        +-+       +-+       +-+
                        |     5         1     |
               Data --> |     o    6    o     | <-- SrqIn
                        |          o          |
                        |     4         2     |
                Clk --> |     o    3    o     | <-- Gnd
                        |          o          |
                        +-+                 +-+
                          +-----------------+
                                   ^
                                   |
                                  Atn
This is the XE1541 cable (won’t work with this driver):
    CBM drive serial port   PC parallel port

        2  Gnd ---------- 18-25  Ground
        3  Atn --------+---- 13  SelectIn
                       +->|-- 1  Strobe
        4  Clk --------+---- 12  PaperEnd
                       +->|- 14  AutoFeed
        5  Data -------+---- 11  Busy
                       +->|- 17  SelectIn
        6  Reset ------+---- 10  Ack
                       +->|- 16  Init
This is the XM1541 (pins 5 & 6 on the CBM end exchanged)
    CBM drive serial port   PC parallel port

        2  Gnd ---------- 18-25  Ground
        3  Atn --------+---- 13  SelectIn
                       +->|-- 1  Strobe
        4  Clk --------+---- 12  PaperEnd
                       +->|- 14  AutoFeed
        6  Reset ------+---- 11  Busy
                       +->|- 17  SelectIn
        5  Data -------+---- 10  Ack
                       +->|- 16  Init
Besides the XM1541, a XA1541 cable is also supported. That cable consists of the same connections as the XM1541, but instead of using diodes, it uses transistors which drive the lines better. Because of this difference, the logic for outputs is reversed between the XA1541 and the XM1541.
Additionally to the cable types above, OpenCBM also supports XP1541 and XP1571 parallel cables, which have to be used in conjunction with the XM1541 or XA1541 cable.
For more information about the different supported cables (XM1541, XA1541, XP1541, XP1571) can be obtained on the Star Commander homepage ( http://sta.c64.org/xcables.html)
2. News/Changelog
OpenCBM v0.4.99.104:
- new: xum1541cfg: add bootloader command
- new: cbmctrl add low-level IEC line handling (ireset, uireset, atn, uatn, data, udata)
- new: xum1541 firmware version 8 for PROMICRO boards with various fixes and additions (SRQ nibbling, bootloader)
- new: xum1541 firmware split into supported and unsupported devices; new make target “unsupported”
- new: xum1541 firmware and plugin: include compilation details
- new: xu1541 firmware: Generated combined bootloader and firmware hex files for easier initial setup
- fix: Windows installation could not update the installed driver for xu1541 or xum1541 devices. Fixed, update works now.
- fix: xum1541 firmware: fix IEC_SRQ setting/unsetting which resulted in unpredictable behaviour
- change: cbmcopy: don’t filter user-provided local output filenames
- change: Various fixes for newer compilers (gcc) and platforms (Linux 5.x)
- change: change devmodel for parport driver to allow compilation with newer versions (Linux)
- change: do not build plugins that are not needed
OpenCBM v0.4.99.103:
- new: Windows installation script for automatical installation
- new: Pre-built Linux packages
- new: MacOS and FreeBSD ports
- new: Integration of USB based devices (XU1541, XUM1541) by introducing a plugin concept
- new: tool d82copy
- new: Allow serial nibbling for nibtools with VIC-1570 and VIC-1571 devices
- change: Transfer routines are more robust now
- change: Added option –petscii to cbmctrl
- change: Various fixes for newer compilers (gcc) and platforms (Linux 3.x, 4.x, Windows 10)
- fix: Many, many bug fixes
- Moved development for SourceForge to GitHub
OpenCBM v0.4.2 (2007-11-18):
- Windows:
- Added upgrade instructions to the manual ( upgrading )
- The 0.4.1 Windows binary release was not wrong, but the resulting binary files were way to big. Additionally, the documentation was missing. Fixed that. (Found by Joe Forster)
OpenCBM v0.4.1 (2007-11-11):
- General:
- Issue a UNLISTEN after a successfull cbm_close(). This was a deviation from the original protocol. I don’t know if this has any practical implications.
- When doing transfers, give the kernel time to `breath’ between the single bytes (code was already there, but erroneous) (found by Till Harbaum)
- Linux driver:
- The build system is more robust regarding the shell used. It now specifically asks for bash.
- Fixed build errors with newer Linux kernels (Spiro Trikaliotis, Frédéric Brière)
- Fixed build errors with AMD64 targets (Spiro Trikaliotis, Frédéric Brière)
- Implementation of cbm_setrelease() was wrong, as only only lines was modified (fixed by Till Harbaum)
- Remove all files on uninstall
- Windows driver:
- If the parallel port supported neither ECP nor EPP, OpenCBM refused to load. Fixed this.
OpenCBM v0.4.0 (2006-04-28):
cbm4win and cbm4linux have been re-joined to opencbm; for the NEWS, have a look at the documentation (http://opencbm.trikaliotis.net/, or with “info opencbm”).
- General:
- Reorganized structure so cbm4win and cbm4linux compile from the same sources
- Fixed many minor and major errors
- Added mnib36 ( http://rittwage.com/c64pp/dp.php?pg=mnib) support
- cbmforng: New tool, cf. cbmforng
- rpm1541: New tool, cf. rpm1541
- General, Windows specific:
- Use a free build instead of a checked build. This significantly reduces the memory footprint.
- compiles for AMD64, iA64, i386 (Windows only)
- VDD to allow DOS programs to access cbm4win
- new unit file for Delphi, to allow to access cbm4win from Delphi
- New project OpenCBMvice for debugging with the help of VICE ( https://vice-emu.sourceforge.io/). For this, a special version of VICE is needed.
- Linux driver:
- Fixed kernel source directory (Dirk Jagdmann)
- Fixed installation with GNU coreutils head (Dirk Jagdmann)
- Added correct module installation dir for Linux 2.6 (Dirk Jagdmann)
- Added descriptions for module parameters (modinfo cbm) (Dirk Jagdmann)
- Added “smart reset” for cbm4linux: Delay the reset until all drives are ready.
- Windows driver:
- Only access the bus if the parallel port was successfully acquired.
- Added ECP and EPP support into NT4 driver (allowing XP1541 cable to be used there)
- On reset, do not wait a fixed timeout anymore, just wait until all drives are ready again
- instcbm:
- –lock, –cabletype: New options
- –automatic is default now, new option –on-demand for old behaviour
- Added -V (–version) command-line option
- Reworked start of driver. It was unloaded and loaded before, which does not make sense
- cbmctrl:
- cbmctrl popen, cbmctrl pcommand to do ASCII -> PETSCII conversions
- cbmctrl status, cbmctrl dir: Output the status on stdout, not stderr
- cbmctrl lock, cbmctrl unlock: New commands
- cbmctrl read, cbmctrl write: New commands
- Added –version and –help command-line arguments.
- cbmctrl change drive: New function (heavily based on Joe Forster/STA’s “TDCHANGE” from SC, used with permission)
- cbmctrl detect outputs whether we have a parallel cable
- cbmcopy:
- Fixed some timing problems which resulted in hanging in rare cases;
- Cosmetical fix: The device status is written on a separate line on exit.
- Fixed some races between PC and drive code in the transfer functions serial1, serial2, parallel
- New option –transfer=auto, which is default and finds out the best transfer method for the current setup.
- Do not use $14 in the floppy drive as temporary variable, but $86. This fixes a problem with Rex-DOS.
- Do not trash the file on the PC side if aborted with Ctrl+C.
- d64copy:
- Fixed some timing problems which resulted in hanging in rare cases;
- –warp is default now; New option –no-warp for disabling it.
- did not recognize .d71 files as valid images; fixed that.
- Fixed some races between PC and drive code in the transfer functions serial1, serial2, parallel
- New option –transfer=auto, which is default and finds out the best transfer method for the current setup.
- Do not use $14 in the floppy drive as temporary variable, but $86. This fixes a problem with Rex-DOS.
- Do not trash the file on the PC side if aborted with Ctrl+C.
- API:
cbm_detect_xp1541(): New functioncbm_iec_setrelease(): New functioncbm_iec_set(),cbm_iec_release(): Extended API to allow setting/resetting more than one line at the same time
- Build process (Windows):
- reworked build process (DDKBUILD_START.BAT)
- DDKBUILD_LOCAL.BAT contains settings for the CC65 build process, now.
- ddkbuild_local.bat.sample added as sample for a DDKBUILD_LOCAL.BAT file
- postbuild_local.bat.sample added as sample for a POSTBUILD_LOCAL.BAT file
- Build process (Linux):
- Moved makefiles into LINUX directory; thus, use make -f LINUX/Makefile to compile now.
cbm4linux 0.3.3 (NEVER RELEASED!)
- documentation in –help for d64copy and cbmcopy fixed: now, it is clearly stated that a XP cable must be used in combination with a serial cable, not as only one. (Spiro Trikaliotis)
- fixed crash with unkown long options in d64copy, cbmformat and maybe cbmcopy (Spiro Trikaliotis)
- cbmctrl upload accepts – as filename now (read from stdin)
- cbmctrl download takes optionally a file name argument (Spiro Trikaliotis)
- libd64copy failed to recognize .d71 images as valid images. Because of this, you could not write a .d71 image back to a real floppy drive
- d64copy: If you copy a disk to an image which already exists, the error information was not removed from the file if necessary. This is fixed now. (Spiro Trikaliotis)
- libd64copy: Fixed a crash on exit of d64copy if a .d64 file grows.
parport_enumerate()-fix for kernels>=2.6.4- new ioctl
CBMCTRL_CLEAR_EOIand APIfunction cbm_clear_eoi()(Robert Norris) - minor (still compatible) API changes (Spiro Trikaliotis)
- cbmformat: make sure disk name is 0-terminated (Spiro Trikaliotis)
cbm4win 0.1.0
- Port of cbm4linux 0.3.2 to Windows
cbm4linux 0.3.2
- we’re debianized now
- reset line can now be controlled through cbm_iec_{set,release}
- prepared for the 2.6 kernel series
- new module parameter ‘hold_clk’
- cbmcopy hang-at-exit-bug fixed
- gcc 3.3 fixes (Count Zero, Andreas Boose)
- RPM .spec file tweaks (allows for non-root build)
- 1571 w/ XP1571 hang fixed
- cbm{copy,read,write} didn’t understand ‘-f’ (‘–file-type’ works, though) (reported by Ullrich von Bassewitz)
cbm4linux 0.3.1
- a few compilation fixes for various distros (RH 7.1, slackware 8.0, SuSE 7.3) by me and Kees Jongenburger
cbm4linux 0.3.0
- the fast file copier (cbmcopy/cbmread/cbmwrite) for 1541/1570/1571/1581 drives has landed.
- driver module uses generic parport driver by default
- libopencbm is a shared library now and contains most of the d64copy and cbmwrite code
- an experimental perl API has arrived
- d64copy handles error information
- support for odd-sized .d64 images in d64copy
- head movement optimization for 1571 in double double sided mode
- better error handling in d64copy
- cbmctrl ‘detect’ command added
cbm4linux 0.2.5a
- compilation fix for kernel 2.4.10
cbm4linux 0.2.5
- .d71 support in d64copy, all modes except warp
- cbmformat comes with a ugly progress indicator (-p option)
- minor Makefile fixes
cbm4linux 0.2.4
- SGML documentation to create Texinfo and HTML docs
- 1571/2MHz support in d64copy, Turbo and Warp mode
- XP1571 support in d64copy
- compiles for Linux 2.4.0 kernel
- cbmupload and cbmdownload merged into cbmctrl
- cbm4linux.spec file to build binary RPMs
cbm4linux 0.2.3
- some config.make/Makefile tweaks
- new ioctl’s: CBMCTRL_IEC_WAIT (experimental), CBMCTRL_GET_EOI
- cbmctrl: `dir´ command fixed for devices other than 8
- `cbm.h´ renamed to `cbm4linux.h´, `libcbm.a´ renamed to `libcbm4linux.a´. Both files get installed systemwide in $(INCDIR) resp. $(LIBDIR)
- `xa´ not mandatory any more, as suggested by Ullrich von Bassewitz. Preassembled 6502 binaries included.
- (Forgotten) device locking added. Pointed out by Ullrich von Bassewitz.
- kernel module: #include <linux/config.h> and <linux/modversions.h> (the latter one #ifdef CONFIG_MODVERSION)
- default interleave values increased by one, should be more reasonable now
cbm4linux 0.2.2
- CABLE description fixed (thanks, Joe)
- d64copy: added `-b´ and `-B´ options. Poorly tested.
- d64copy.c: GCR stuff moved to d64copy/gcr.c, code cleanup
- cbmdownload: fixed byte count
- cbmctrl: new command `dir´, no need for petcat any more
- kernel module: use save_flags()/restore_flags() instead of cli()/sti(), module description added
cbm4linux 0.2.1
- XA1541/XM1541 support
- ports in PS/2 mode should work now
- support for 40-track images in d64copy and cbmformat
- new utilities: cbmdownload, cbmupload
cbm4linux 0.2.0a
- bugfix: writing an image with `serial2´ and `turbo’ should work now
cbm4linux 0.2.0
- fast transfer routines in d64copy (serial1, serial2, parallel)
- source tree restructured
- new utility: cbmformat
cbm4linux 0.1.0
- Initial relase
3. Upgrading OpenCBM from an older installation
Currently, OpenCBM does not support a upgrade other than completely uninstalling it, and re-installing it from scratch. Have a look at the uninstall instructions ( uninstall ) and the corresponding install instructions ( installation ).
4. Installation
Depending on the system you are running OpenCBM on, there are different ways to install OpenCBM. Use the appropriate category for you:
4.1 Quick installation walk-through
If you want to install OpenCBM as fast as possible, but you are not interested in the details, just use the instructions from this section and ignore the rest of this chapter unless you encounter any problems.
If you are more interested for a clean installation, skip this section and read the rest of this chapter.
Linux installation with pre-built packages
Before trying to build OpenCBM on your own, you can have a look if it is supported by the pre-built packages at https://software.opensuse.org/download.html?project=home%3Astrik&package=opencbm.
At the time of this writing, there are DEB packages available for Debian 8, 9, 10 (which should also install on Ubutu), as well as Raspbian 9 and 10. Furthermore, RPM based openSUSE package are available, too.
These packages are rebuilt as soon as there are changes to the OpenCBM sources. If you use these packages, you do not need to manually compile and install OpenCBM.
In order to run OpenCBM, you need the package: opencbm-XXX, with XXX being one of xa1541, xu1541 or xum1541. It will install the necessary packages, too.
If you want to mix multiple variants (e.g., you have an xum1541 and an xu1541 device), then you can install both of them (opencbm-xum1541 and opencbm-xu1541). Note that the first device that is installed is the default.
Additionally, there is also a nibtools package available (it is called opencbm-nibtools on RPM based distributions).
Linux installation walk-through
Perform the following steps to install OpenCBM on your Linux machine:
- Get the sources from the tarball at https://spiro.trikaliotis.net/Download/opencbm-0.4.99.104/opencbm-0.4.99.104.tar.bz2.
- Unpack them into a directory (i.e., ~/opencbm-0.4.99.104, with 0.4.99.104 being the version number of OpenCBM).
- cd into the directory: cd ~/opencbm-0.4.99.104
- Compile OpenCBM and the appropriate plugin: make -f LINUX/Makefile opencbm plugin-XXX, with XXX being one of xa1541, xu1541 or xum1541, depending upon which adapter you are using:
- XUM1541 + Zoomfloppy only: make -f LINUX/Makefile opencbm plugin-xum1541
- XU1541 only: make -f LINUX/Makefile opencbm plugin-xu1541
- XA1541 + XM1541 only: make -f LINUX/Makefile opencbm plugin-xa1541
- Now, install the OpenCBM package. You must perform this as root, either by using sudo, or by explicitly becoming root with su. The following command assumes you are using sudo: sudo make -f LINUX/Makefile install install-plugin-XXX, with XXX being the same one of xa1541, xu1541 or xum1541 as above:
- XUM1541 + Zoomfloppy only: sudo make -f LINUX/Makefile install install-plugin-xum1541
- XU1541 only: sudo make -f LINUX/Makefile install install-plugin-xu1541
- XA1541 + XM1541 only: sudo make -f LINUX/Makefile install install-plugin-xa1541
- Connect your cable (XU1541, XUM1541, XA1541, XM1541) to your CBM IEC device:
- XUM1541 + Zoomfloppy + XU1541 only: Plug your XU1541 or XUM1541 into the USB port
- XA1541 + XM1541 only: Plug your XA1541 or XM1541 cable to the parallel port
- Switch on your CBM IEC device.
- XA1541 + XM1541 only: Load the kernel module:
- sudo /sbin/depmod -a
- sudo /sbin/modprobe parport (this one might fail if you have the parallelport compiled into the kernel instead of being a module)
- sudo /sbin/insmod cbm
- Now, check the file /var/log/messages if your cable was correctly recognized.
- You are almost done. Check if the command cbmctrl reset resets your drive, or if the command cbmctrl detect prints out your device with your device number. If this works, you are done! If not, please proceed:
- If you are using an USB based cable (XU1541, XUM1541, ZoomFloppy), unplug the device, wait a second and replug it. This should be necessary only once and only if the device was connected to the PC while OpenCBM was not installed yet.
- If you get an error message that libopencbm cannot be found, you must add it to your linker path. In order to do so, enter the command make -f LINUX/Makefile ldconfig
- Now, everything should be working, and you should be able to use the OpenCBM tools even as non-root.
Mac OS X installation walk-through
Please check the instructions at http://lallafa.de/blog/c64-projects/opencbm-on-mac/ available on the blog of Christian Vogelgsang, who actually ported OpenCBM to the Mac. His site should be your primary source for instructions.
Windows installation walk-through
You need the Windows binaries from https://spiro.trikaliotis.net/Download/opencbm-0.4.99.104/opencbm-0.4.99.104.zip in order to install OpenCBM.
USB driver installation
For Windows, you have to install the USB drivers first if you want to use the ZoomFloppy, XUM1541 or XU1541 devices.
Previous versions of OpenCBM demanded you to install the USB drivers first. You had to fiddle around with the driver signature enforcement in order to get this done, or you had to use an external tool (zadig.exe) to install the USB driver.
This release of OpenCBM included the necessary parts in order to install the USB drivers without manual intervention. When you install the tools (cf. below), you are asked if you want to install the USB drivers.
If you have had any previous versions of OpenCBM installed, you should answer with YES so your drivers will get updated!
Note that this will *not* work for Windows 2000. For this, a separate driver installation package will be provided in the near future, if there is some demand. Just ask me for it.
OpenCBM tool installation
In order to install OpenCBM, proceed as follows:
- Download the OpenCBM package binary for Windows from https://spiro.trikaliotis.net/Download/opencbm-0.4.99.104/opencbm-0.4.99.104.zip Note that unlike previous versions of OpenCBM, v0.4.99.104 now contains one package for all supported architectures (i386 vs. amd64, 32 bit vs. 64 bit). You do not have to choose which one to get.
- Unpack it into a directory of your liking
- Go to the directory where you unpacked the OpenCBM installation package (with the “cd” command)
- For Windows XP: Enter
- ZoomFloppy only: install -xp zoomfloppy (this is also default, that it, it suffices if you enter install only)
- XUM1541 only: install -xp xum1541
- XU1541 only: install -xp xu1541
- XA1541 only: install -xp xa1541
- For Windows 7 and above: Enter
- ZoomFloppy only: install zoomfloppy (this is also default, that it, it suffices if you enter install only)
- XUM1541 only: install xum1541
- XU1541 only: install xu1541
- XA1541 only: install xa1541
- Windows will start the installation procedure. If needed (Windows 7 and above), it will give you the UAC prompt in order to get additional rights for installation. You must allow this, or OpenCBM will not install successfully. On Windows XP, it will ask you for your administrator password. Again, you must give it, or OpenCBM will not install successfully.
- Afterwards, it will ask you if you want to install the USB drivers. Note that OpenCBM 0.4.99.104 uses other drivers than previous versions of OpenCBM, and it will not work reliably with the old drivers! Thus, if you are upgrading or installing for the first time, answer “yes” here.
- The installation program will add a link to a command line console on the Desktop of the current user. That link can be used to use the OpenCBM tools. For this, the directory where OpenCBM was installed is added to the path, but only on that console window!
4.2 Installing OpenCBM on Mac OS X (USB cable)
For Mac OS X, there are special installation instructions available on the blog of Christian Vogelgsang, who actually ported OpenCBM to the Mac. His site should be your primary source for instructions.
4.3 Installing OpenCBM on Linux or FreeBSD
The installation of OpenCBM differs a little bit depending on the cable used to connect your CBM equipment. The following instructions try to show the installation procedure as straight-forward as possible. At first, I will describe the prerequisites for each cable type. Afterwards, I will describe the installation bits that are common to all cable types. At last, I will describe some special postprocessing steps that are needed for some cable types.
Prerequisites
XUM1541 cable (a.k.a. ZoomFloppy) and XU1541 cable
These two cables are rather easy. In order to compile them, you need the libusb packages (libusb 1.0, not 0.1) and the corresponding libusb development package. For Debian based systems, it is enough to install the package `libusb-1.0-0-dev’.
XA1541 cable or XM1541 cable
The XA1541 cable and the XM1541 cable need a kernel module (cbm.o on Linux, opencbm.ko on FreeBSD) which acts as a driver for the parallel port based cables.
The kernel module on Linux (cbm.o) does not require any kernel patches and should compile right out of the box, at least with kernel 4.x, 3.x and 2.6.x, but 2.0.x, 2.2.x and 2.4.x might still work as well. They have not been tested in ages, though, thus, you are on your own.
In order to compile the kernel module, you will need the headers that correspond to your current running kernel. For debian-based systems, you can accomplish this by running aptitude install linux-headers-`uname -r` as root.
The kernel module on FreeBSD (opencbm.ko) should compile out of the box as well; to compile it, you will need to have the FreeBSD source installed in /usr/src. This can be selected in the FreeBSD installer. For FreeBSD, it is recommended to build from the official ports found in comms/opencbm, comms/opencbm-kmod and comms/opencbm-plugin-xa1541 instead. If you prefer not to use these ports, note that for FreeBSD, you will still have to use the LINUX/Makefile, see below.
Any cable type
If you intend to modify the drive routines for `d64copy’ and `cbmformat’ you also need a crossassembler. `opencbm/LINUX/config.make’ comes with rules for Ullrich von Bassewitz’ `cl65′ (comes with cc65, http://www.cc65.org/). Starting with version cbm4linux 0.2.3, OpenCBM includes precompiled 6502 binaries, so as long as you don’t touch the .a65 files, there’s no need for a crossassembler.
This package comes with a .spec file for those who want to build binary .RPMs. See the RPM documentation (outside of this paper) for details about the build process. Additionally, all files needed to built Debian .DEB packages are included. If you upgrade from a previous (non-RPM and non-DEB) version and want to install a packetized binary version (RPM or DEB), don’t forget to remove the old files hanging aroung (just do “make uninstall“, preferably in the *old* source directory. For a >= 0.4.0 version of OpenCBM, change the line to “make -f LINUX/Makefile uninstall“.).
Compile-time configuration
The compile-time configuration is located in `opencbm/LINUX/config.make’. Check the KERN_FLAGS line if you’re running kernel 2.0.x or if you don’t want to use the Linux parport subsystem for some reason. Same goes for SMP machines.
Compilation
- Type make -f LINUX/Makefile opencbm plugin-XXX (no root privileges required) (replacing XXX with either xum1541, xu1541 or xa1541, depending upon the cable type you are using) to build OpenCBM, which includes the libraries and utility programs (no root privileges required). Example: In case you are compiling for the xum1541 cable, use make -f LINUX/Makefile opencbm plugin-xum1541
- If you are using an XA1541 or XM1541 cable, issue make -f LINUX/Makefile dev (as root) to create the character device “/dev/cbm” with major 10 and minor 177 (this number is registered, so it shouldn’t collide with anything else :)).
- Finally, install everything by running make -f LINUX/Makefile install install-plugin-XXX (as root) again replacing XXX with xum1541, xu1541 or xa1541, depending upon the cable type you are using. This will install all necessary stuff to /usr/local/… (can be changed in `opencbm/LINUX/config.make’)
Loading the kernel module (XA1541/XM1541 only)
This is only needed if you are using the XA1541 or XM1541 cables. Otherwise, skip this section
This section describes the kernel module for Linux. For the FreeBSD kernel module, please refer to the included man page, opencbm(4)
If you’re using the parport subsystem (which is default), you should now be able to load the driver module by issuing (as root)
- /sbin/depmod
- /sbin/modprobe parport (unless compiled into the kernel, or already loaded))
- /sbin/modprobe cbm lp=your_lp (usually 0, which is default; if you only have one parallel port, you can also use /sbin/modprobe cbm instead)
or, when built with -DDIRECT_PORT_ACCESS:
- /sbin/modprobe cbm port=your_ioport irq=your_irq (default is 0x378 for port, 7 for irq)
Check /var/log/messages if the correct cable type was recognized (XA1541/XM1541).
udev rules so that you can access the cables as non-root user (Linux only)
Normally, you will have access to your device only if you are logged in as root, or if you use sudo. You might want to change this behaviour. For this, OpenCBM includes udev rules that allow you to customize who is able to access the devices.
These files are located in:
- opencbm/sys/linux/45-opencbm-xa1541.rules (for XA1541/XM1541 cables)
- xu1541/udev/45-opencbm-xu1541.rules (for XU1541 cables)
- xum1541/udev/45-opencbm-xum1541.rules (for XUM1541 cables)
The appropriate file(s) are copied into the directory /etc/udev/rules.d/ at installation time. They will allow any member of the group user to use the corresponding cable.
If you want to use another group, just change the files accordingly.
Troubleshooting
Finding the cause of a failure condition can be hard. Anyway, the following tips might help you:
- Check
/var/log/messages; it might give you some hints. - For XU1541 and XUM1541 cable:
- Did you install libusb? You need v1.0; a v0.1 libusb will still work for the moment, but it is not recommended and will be removed from future releases.
- For XA1541 and XM1541 cable:
- If you are using the parport subsystem (no -DDIRECT_PORT_ACCESS):
- the port might be occupied by another device (e.g. `lp.o’). cbm.o does NOT support port sharing (wouldn’t work anyway). Enter lsmod|grep parport to find out.
- parport_pc might not use an IRQ. /etc/modules.conf should contain something like:
alias parport_lowlevel parport_pc options parport_pc io=0x378 irq=7Check the interrupts with cat /proc/interrupts.
- Using direct port access (with -DDIRECT_PORT_ACCESS):
- The port/IRQ might occupied by another driver (e.g. parport.o) Enter cat /proc/interrupts and cat /proc/ioports to find out.
- If you are using the parport subsystem (no -DDIRECT_PORT_ACCESS):
Device access
As a first test, try something simple like
- cbmctrl command 8 I0: (assuming drive 8)
- cbmctrl status 8
(no root privileges required)
Failure can be caused by:
- Possibly, the shared library in
/usr/local/lib/cannot be found; in this case, add/usr/local/lib/to/etc/ld.so.confand execute ldconfig (as root). - You might not have the necessary rights to the
/dev/cbmdevice; try chmod 777 /dev/cbm - incorrect module parameters
- wrong BIOS settings (esp. IRQ)
- broken cable
Runtime configuration (Applies to XA1541 and XM1541 cables only!)
Most probably, you will want to add this to /etc/modules.conf to have the driver loaded on demand: (the file is called /etc/conf.modules on some older SuSE systems)
    alias char-major-10-177 cbm
    options cbm [options]
With [options] being one or more of:
- lp=*lp* (parport only, as used in /sbin/modprobe above)
- irq=*irq* (direct port only, as used in /sbin/modprobe above)
- port=*port* (direct port only, as used in /sbin/modprobe above)
- cable=*n* force cable type:
- -1 for autodetection (default)
- 0 for XM1541 (non-inverting)
- 1 for XA1541 (inverting)
- reset=*n* initializing behaviour:
- -1 smart IEC reset (direct port default); only change the status of the reset line if it was set on start
- 0 no IEC reset on driver start
- 1 force IEC reset (parport default); always reset the device on driver start
Security considerations
By default, OpenCBM installs the device driver so that anyone has access to the CBM devices:
    $ ls -l /dev/cbm
    crw-rw-rw- 1 root root 10, 177 2007-11-11 14:34 /dev/cbm
You might want to change this behaviour to control more specifically who is allowed to use OpenCBM, and who is not.
The best way is to define a group (for example, `cbmuser’) and restrict the access rights to the owner (root) and this group (cbmuser) only.
I assume you already have defined a group `cbmuser’, for example, by using groupadd(8) (all Linux variants) or addgroup(8) (all Debian based Linux distributions).
Now, you can restrict the access by two different means, depending upon if you are using devfs or udev:
- If you are using devfs (all Linux kernels prior to 2.6.0), this can be done by issuing the commands
$ chmod 660 /dev/cbm $ chgrp cbmuser /dev/cbm $ ls -l /dev/cbm crw-rw---- 1 root cbmuser 10, 177 2007-11-11 14:34 /dev/cbm - If you are using udev (newer 2.6.x kernels) instead, you have to modify the file /etc/udev/rules.d/45-opencbm-parallel.rules. It looks like follows:
ACTION!="add", GOTO="opencbm_plugin_xa1541_rules_end" # xa1541/xm1541 parallel port driver KERNEL=="cbm", GROUP="root", MODE="0666" LABEL="opencbm_plugin_xa1541_rules_end"To change the group to another one, change the part `root’ in `GROUP=”root”‘ by the name of the group you want to use. To change the access mode, change `MODE=”0666″‘ to `MODE=”0660″‘, so your files looks like:ACTION!="add", GOTO="opencbm_plugin_xa1541_rules_end" # xa1541/xm1541 parallel port driver KERNEL=="cbm", GROUP="cbmuser", MODE="0660" LABEL="opencbm_plugin_xa1541_rules_end"For your changes to take effect, issue$ rmmod cbm $ modprobe cbmYou might also want to adjust the file `sys/linux/45-opencbm-parallel.rules’, which is used when installing the OpenCBM driver out of the source package.
Congratulations, you have successfully set up your OpenCBM installation!
5. Checking if the installation is complete
After you installed OpenCBM (cf. Installation, it is wise to check if the installation works as expected. For this, do the following:
- Switch on the floppy drive. If you are using a parallel port based cable (XA1541 or XM1541), the drive might keep spinning endless now, because it is continuously resetted. This is not an error!
- Type “cbmctrl reset” and press enter. If it does not already, the red floppy drive LED should light up, and the drive should start spinning. After approximately one second (up to five seconds in the case of a 1581), the red LED should switch off again, and the drive stops spinning.
- Type “cbmctrl status 8” to get the status (error) code from the attached floppy drive. If everything works fine, your drive should answer with its identification string. For a 1541, this is something like 73,cbm dos v2.6 1541,00,00, while for a 1571, this line looks like 73,cbm dos v3.0 1571,00,00. There might also be some variant of this line, depending on the firmware version of your drive.
- Type “cbmctrl status 8” to get the status (error) code from the floppy drive again. As the power on message has been read, your drive should answer with a 00, ok,00,00 string.
- Type “cbmctrl detect“. This command tries to detect the types of drive which are connected on the cable. You should see the drive which you posess.
- We want to check if we can send anything to the floppy drive. Remove any diskette from the drive and press “cbmctrl open 8 15 I0“. (Make sure the “I” is an upper-case “I”. A lower-case “I” will not work!) This command tries to initialize the disk. Anyway, since there isn’t a disk in the drive, an error occurs. You should hear the floppy spinning, and in case of a 1541, the R/W-head should start bumping. After some seconds, the red LED starts starts flashing, indicating that an error occurred.
- Try again “cbmctrl status 8” to get the status (error) code from the floppy drive. As an error occurred before, an error string should be displayed. For my setup, it is the “21,read error,18,00” string. Furthermore, the red LED should stop flashing.
If you have come so far, you are sure that you send commands to the floppy, and receive answers from it. This is very good so far. Furthermore, don’t panic: you do not have to enter these commands over and over again, these are only tests to make sure that anything is correctly installed.
If you have a D64 file or a floppy disk ready, you can try transferring it over the cable. Do not use all of the following commands, but only the ones you want to perform.
- If you want to transfer an existing floppy from the drive to the PC, use the following command: “d64copy 8 A.D64“, while replacing A.D64 by the name you want to give to the file.
- WARNING THE FOLLOWING COMMAND OVERWRITES ANYTHING THAT WAS ON THE FLOPPY BEFORE, so make sure you do not need that floppy anymore. If you have a D64 or D71 on your PC, and you want to write it to a new, already formatted disk, enter “d64copy A.D64 8” if the file is called A.D64.
- WARNING THE FOLLOWING COMMAND OVERWRITES ANYTHING THAT WAS ON THE FLOPPY BEFORE, so make sure you do not need that floppy anymore. If you have a disk you want to format, you have two options: Either use the command “cbmctrl command 8 N0:NAME,ID“, or use the cbmformat program, cf. cbmformat, or the cbmforng program, cf. cbmforng.
You can have a look at the available cbmctrl commands by issuing cbmctrl on your command line, or look at cbmctrl. For the other programs, you get help by issuing the “–help” option, or look at the appropriate section in utilities.
6. Uninstall
Depending on the system you are running OpenCBM on, there are different ways to uninstall OpenCBM. Use the appropriate category for you:
6.1 Quick uninstallation walk-through
If you want to uninstall OpenCBM as fast as possible, but you are not interested in the details, just use the instructions from this section and ignore the rest of this chapter unless you encounter any problems.
If you are more interested in a clean uninstallation, skip this section and read the rest of this chapter.
Linux uninstallation with pre-built packages
If you installed OpenCBM with the pre-built packages (from openSUSE), then you just have to uninstall OpenCBM via the mechanism of your system (apt, aptitude, synaptics, YaST, …)
Linux uninstallation walk-through
Perform the following steps to uninstall OpenCBM on your Linux machine:
- I assume you already have an installation directory for OpenCBM handy. Let’s assume it is ~/opencbm-0.4.99.104, with 0.4.99.104 being the version number of OpenCBM.
- cd into the directory: cd ~/opencbm-0.4.99.104
- Enter: sudo make -f LINUX/Makefile uninstall
- Now, everything should be uninstalled.
Mac OS X uninstallation walk-through
Please check the instructions at http://lallafa.de/blog/c64-projects/opencbm-on-mac/ available on the blog of Christian Vogelgsang, who actually ported OpenCBM to the Mac. His site should be your primary source for instructions.
Windows uninstallation walk-through
In order to uninstall OpenCBM, proceed as follows:
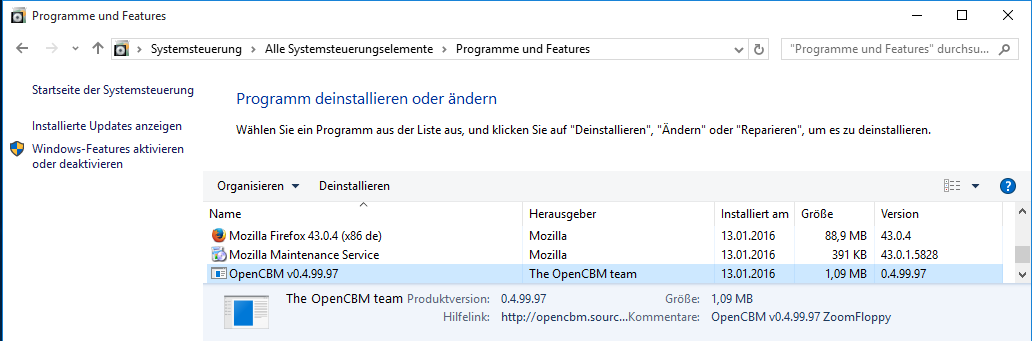
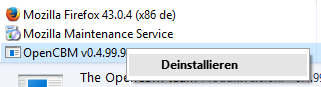
- If you did follow the quick installation walk-through:
- Go to the control panel, select Programs, and have a look at the list of installed programs opencbm-software-installed .
- Right-click on the entry “OpenCBM”, and select “uninstall” opencbm-software-installed-uninstall .
- If you added the OpenCBM installation directory to your path, you should undo this.
- If you did not follow the quick installation walk-through:
- Open a cmd.exe shell with administrator privileges.
- cd into the directory where OpenCBM is installed.
- Enter instcbm –remove to uninstall OpenCBM.
- If you added the OpenCBM installation directory to your path, you should undo this.
7. Utilities
As the kernel driver is quite useless for itself, the following utility programs are included with this package:
- cbmctrl (cf. cbmctrl) command line utility for direct device access at talk/listen level.
- cbmformat (cf. cbmformat) fast 1541 disk formatter (for 1541, 1570 and 1571 drives).
- cbmforng (cf. cbmforng) fast 1541 disk formatter (for 1541, 1570 and 1571 drives).
- d64copy (cf. d64copy) copies .d64 images to 1541 compatible drives and vice versa. Type `d64copy -h’ to get a list of valid options. Use the device number to address the disk drive, e.g. `d64copy -t serial2 8 img.d64′. This version contains the StarCommander Turbo and Warp routines and custom transfer routines as well as parallel cable (XP1541) support. These are the benchmarks for Michael Klein’s old Pentium-200/MMX system (seconds)
mode write read parallel turbo 54.02 53.30 parallel warp 32.47 29.56 serial1 turbo 168.59 168.58 serial1 warp 183.57 158.87 serial2 turbo 95.02 95.26 serial2 warp 88.29 80.57 - d82copy (cf. d82copy) Like d64copy, but for d80 and d82 images with a CBM 8250 drive or compatibles.
- imgcopy (cf. imgcopy) Tries to integrate the functionality of d64copy and d82copy into one generic application.
- cbmcopy (cf. cbmcopy) fast 1541/1570/1571/1581 file copier.
- rpm1541 demo (cf. rpm1541) determines the drive rotation speed of 1541, 1570 and 1571 drives.
- flash demo (cf. flash) flashes the LED of 1541, 1570 and 1571 drives.
- morse demo (cf. morse) morses arbitrary texts with the help of the LED of 1541, 1570 and 1571 drives.
- cbmlinetester debugging aid (cf. cbmlinetester) is a debugging aid which helps you set the IEC lines to specific values and read out the current state of the lines.
7.1 instcbm (Windows only)
instcbm is used on Windows to install the OpenCBM driver.
Please note that the syntax of instcbm has changed considerably in v0.4.99.104 with respect to the syntax used until version v0.4.2!
instcbm invocation
Synopsis: instcbm {[global-options] [plugin] [plugin-options]}*
Where the following [global-options] are possible:-h, –help
display help and exit.-V, –version
display version information about OpenCBM.-r, –remove
remove (uninstall) the driver.-u, –update
update parameters if driver is already installed.-n, –nocopy
do not copy the driver files into the system directory. This is not recommended.-c, –check
only check if the installation is ok. Do not install or uninstall anything.-@, –adapter=[plugin]
Define the specified plugin as default plugin.
The [plugin] is one of xa1541, xu1541 or xum1541. For each plugin, there are plugin specific options possible.
For the xa1541 plugin, the following [plugin-options] are possible:-h, –help
display help and exit.-V, –version
display version information about the xa1541 plugin.-l, –lpt=*no*
set default LPT port to number *no*. For example, for LPT2, use –lpt=2.
If not specified, or –lpt=0 is specified, use the first parallel port.-t, –cabletype=*TYPE*
set cabletype to *TYPE*, which can be auto, xa1541 or xm1541.
If not specified, –cabletype=auto is assumed.-L, –lock=*WHAT*
automatically lock the driver. *WHAT* can be yes (automatically lock) or no (do not automatically lock).
If not specified, –lock=yes is assumed.-F, –forcent4
force the NT4 driver on a Win 2000, XP, or newer systems (NOT RECOMMENDED!). This option is only available on i386 architectures; AMD64 and iA64 do not support it.-A, –automatic
(default) automatically start the driver on system boot.
The driver can be used from a normal user, no need for administrator rights. The opposite of –on-demand.-O, –on-demand
start the driver only on demand.
The opposite of –automatic.
For the xu1541 plugin, the following [plugin-options] are possible:-h, –help
display help and exit.-V, –version
display version information about the xu1541 plugin.
For the xum1541 plugin, the following [plugin-options] are possible:-h, –help
display help and exit.-V, –version
display version information about the xum1541 plugin.
instcbm Examples
Install the XA1541/XM1541 driver and the DLL on the machine. The driver and the DLL are copied into the Windows system directory, so OpenCBM can be used from every program:
instcbm xa1541
Install the driver, like above. Additionally, specify that you are using an XM1541 cable:
instcbm xa1541 --cabletype=xm1541
Check if the installation was set up successfully:
instcbm --check
Install OpenCBM ready for use with the XU1541 cable:
instcbm xu1541
Install OpenCBM ready for use with the XUM1541 (a.k.a. ZoomFloppy) cable:
instcbm xum1541
Install OpenCBM for all the XA1541, XU1541 and XUM1541 cables at once, making the xum1541 cable the default adapter:
instcbm xum1541 xu1541 xa1541
or, equivalent:
instcbm --adapter=xum1541
Change the default adapter after OpenCBM was already installed:
instcbm --update --adapter=xa1541
Remove the driver including all plugins from the system. You will not be able to use OpenCBM after this command, unless you re-install it. If files were copied into the Windows system directory, they will be removed:
instcbm --remove
After OpenCBM has been installed (with instcbm>), change the parallel port to be used to 2:
instcbm --update xa1541 --lpt=2
Install OpenCBM, directly specifying LPT3 as the parallel port to use:
instcbm xa1541 --lpt=3
Install the DLL and the driver on the machine. Do not copy the files to the Windows system directory, but leave them “where they are”. If you use this option, the directory where your files resides must be accessible for the system while booting. For example, network drives, USB drives or FireWire drives are not allowed.
instcbm --nocopy
7.2 cbmctrl
cbmctrl is used to send commands to external devices. It can control all kinds of serial CBM devices like floppy drives and printers. So far, it has been successfully tested with the disk drives 1541(-II), 1571 and a MPS-1200 printer.
Command structure
The overall format of all cbmctrl actions is:
Synopsis: cbmctrl [global_options] ACTION [action_args]global_options
Some options that are related to cbmctrl in general of which affect the oervall behaviour of all actionsaction
One of a bunch of different subcommands that direct cbmctrl what to doaction_args
Arguments that are required for the subcommand action to work
Global options
cbmctrl understands the following global options-h [ACTION], –help [ACTION]
Outputs the help screen with a short listing of all available actions. If the optional ACTION name is given also, you retrieve more information on a special action together with its arguments and parameters-V, –version
Output version information as well as the built date and time-@, –adapter=<plugin>[:<bus>]
Specify the plugin to use. If you have installed more than one plugin (XA1541, XU1541, XUM1541), you can specifiy which one to use for this command. This way, you can use all three variants at the same time.
This requires an argument of the form <plugin>[:<bus>], where <plugin> is the plugin’s backend name (currently: xa1541, xu1541, xum1541), and <bus> is the bus identifier, if it is supported by the backend.-f, –forget
Future extension, unused at the moment-p, –petscii (default for all actions but open and command)
Convert input or output parameter from CBM format (PETSCII)
When specifying texts to be sent to the floppy or when receiving texts from the floppy, convert them from/to petscii before outputting. This way, small letters on the PC side are small letters on the CBM side. The opposite is -r, –raw.-r, –raw (default for open and command
Do not convert data between CBM and PC side. The opposite to –petscii.
Actions overview
cbmctrl understands the following subcommand actionsreset
Reset all drives on the IEC busdetect
Detect all drives on the IEC buslock
Lock the parallel port for OpenCBM (cbm4linux/cbm4win) useunlock
Unlock the parallel port from exclusive usagelisten
Perform a listen on the IEC bustalk
Perform a talk on the IEC busunlisten
Perform an unlisten on the IEC busuntalk
Perform an untalk on the IEC busopen
Perform an open on the IEC buspopen
Same as open, but with ASCII to PETSCII conversion. Its use is deprecated, use the global option –petscii with open instead.close
Perform a close on the IEC busread
Get a stream of raw data from an IEC bus devicewrite
Put a stream of raw data to an IEC bus deviceput
Put specified data to the IEC bus device. In contrast to write, it allows you to specify the data as decimal, hexadecimal or octal values.status
Give the status of a specified drivecommand
Issue a command to a specified drivepcommand
Same as command, with ASCII to PETSCII conversion Its use is deprecated, use the global option –petscii with command instead.dir
Output the directory of a disk in a specified drivedownload
Download memory contents from a floppy driveupload
Upload memory contents to a floppy drivechange
Wait for a disk to be changed in a specified drive
Common action arguments
Many of the cbmctrl subcommands understand the following common arguments:[DEVICE]
Advice cbmctrl to direct its communication to the IEC bus device with the number [DEVICE]. IEC bus device numbers can be denoted in the range from 0 to 30, although no Commodore device is known to use device numbers 0 to 3. Most commonly used are the numbers 4 (printer) and 8 to 11 (disk drives). Device number 31 is used to denote the UNTALK respectively the UNLISTEN command code on the IEC bus instead of the TALK respectively LISTEN command code, therefore device address 31 cannot be used in general.[SECADR]
With several cbmctrl actions the secondary address parameter [SECADR] denotes a dedicated logical communication channel for the specifed [DEVICE] . IEC bus channel numbers can be denoted in the range from 0 to 15. Take note that for floppy disk drive devices some secondary addresses are interpreted in a special way. Secondary address 0 is used, when a program is loaded, address 1, when a program is saved. Address number 15 represents the command channel of the disk drive, so effectively, for bulk data transfers to and from disk drives, only the logical channel numbers 2 to 14 can be used.
Actions
cbmctrl understands the following actions:reset
This action performs a hardware reset of all devices attached to the IEC bus. Control is returned after it is made sure that all devices are ready.detect
This action tries to detect all devices attached to the IEC bus. For this, this subcommand accesses all possible devices and tries to read some bytes from its memory. If a devices is detected, its name is output. Additionally, this routine determines if the device is connected via a parallel cable (XP1541 companion cable for XA1541/XM1541 cables, or the equivalent option for the XU1541 or XUM1541 cables; may be true for disk drives only).lock
This command locks the parallel port for the use by OpenCBM, so that sequences of e.g. talk/read/untalk or listenwrite/unlisten are not broken by concurrent processes wanting to access the parallel port.
You should issue cbmctrl lock before doing any access to OpenCBM tools, and cbmctrl unlock after you are done.unlock
This command unlocks the parallel port after the use by OpenCBM.
You should issue cbmctrl lock before doing any access to OpenCBM tools, and cbmctrl unlock after you are done.listen device secadr
Tell device device to listen on secondary address secadr. Until the next unlisten command, everything output with cbmctrl write will be received by this device.
This command corresponds to the following 6502 assembly code on a C64:
lda #device
jsr $ffb1
lda #secadr
ora #$60
jsr $ff93
talk device secadr
Tell device device to talk on secondary address secadr. Until the next untalk command, data from this device can be received device by using the command cbmctrl read.
This command corresponds to the following 6502 assembly code on a C64:
lda #device
jsr $ffb4
lda #secadr
ora #$60
jsr $ff96
unlisten
Ends communication with listening devices after a listen command. This corresponds to the C64 kernel routine $ffae.untalk
Ends communication with talking devices after a talk command. This corresponds to the C64 kernel routine $ffab.open device secadr filename
Open file filename on device device. After opening, data can be read/written by sending a talk resp. listen command with the secondary address secadr.
If secadr is greater than 1, the file type and access mode must also be specified by appending ,type,mode to filename. Valid types are D, P, S, U, R (DEL, PRG, SEQ, USR, REL), valid modes are R for reading and W for writing.
Depending upon if –petscii or –raw is specified, the file name is converted before being sent on the IEC bus.
Note: You cannot do an open without a filename. Although a CBM machine (i.e., a C64) allows this, this is an internal operation for the Computer only. It does not have any effect on the IEC bus.popen device secadr filename
Like cbmctrl open, but converts the filename from ASCII to PetSCII before sending it to the floppy.
Its use is deprecated, use open with –petscii instead.close device secadr
Close the file associated with secondary address secadr on device device.read [file]
This command reads raw data from the IEC bus and outputs it into the given file, or to stdout if no file is given (or if it is a simple dash, “-“).
If –petscii is given, the output is converted from PETSCII before being output to the file or to stdout.write [file]
This command writes raw data to the IEC bus; the data is taken from the given file, or from stdin if no filename is given (or if it is a simple dash, “-“). If –petscii is given, the output is converted to PETSCII before being output to the IEC bus.put [-e|–extended] <datastr> [<data1> … <dataN>]
puts the specified data to the IEC bus
With this command, you can write raw data to the IEC bus. <datastr> is the string to output to the IEC bus. It must be given, but may be empty by specifying it as “”.
<data1>, …, <dataN> are additional bytes to append to the string <datastr>. Single bytes can be given as decimal, octal (0 prefix) or hexadecimal (0x prefix).
If the option -e or –extended is given, an extended format is used: You can specify extra characters by given their ASCII value in hex, prepended with `%’, that is: `%20′ => SPACE, `%41′ => `A’, `%35′ => `5′, and-so-on. A `%’ is given by giving its hex ASCII: `%25′ => `%’.
If using both –pestscii and –extended options, the bytes given via the `%’ meta-character or as <data1>, …, <dataN> are not converted to petscii.status device
Copies input from device device, secondary address 15 (command/status channel), to the standard output stream. Note that all upper case characters are changed to lower case. Carriage return (0x0d) is also changed to the current operating system’s line ending convention (0x0a on Unix oriented systems, 0x0d 0x0a on Windows oriented systems or whatever else is appropriate for your operating system).
Assuming the device number is 8, this command is similar to (in this case, no character conversions would be made)
cbmctrl lock
cbmctrl talk 8 15
cbmctrl read
cbmctrl untalk
cbmctrl unlock
The output depends upon if –petscii or –raw is specified.command device cmdstr
Sends cmdstr to device device, secondary address 15 (command/status channel).
Depending upon if –petscii or –raw is specified, the file name is converted before being sent on the IEC bus. Be careful, though, because the –petscii conversion might break some commands like M-W and M-E. If in doubt, it is better to use –raw and use the commands in upper case (kind of poor man’s PetSCII conversion).
Assuming the device number is 8, this command is identical to (Note: This does not work on Windows, because echo there does not know the -n option.)
cbmctrl lock
cbmctrl listen 8 15
cbmctrl put "cmdstr"
cbmctrl unlisten
cbmctrl unlock
Note that the command cbmctrl put “cmdstr” replaced the older variant echo -n cmdstr|cbmctrl write –, which still works.pcommand device cmdstr
Like command, but converts the data from ASCII to PetSCII before sending it. Its use is deprecated, use command with –petscii instead.dir device [filespec]
Read directory from disk in device device, print on standard out.
The output depends upon if –petscii or –raw is specified.
You can also specifiy a filespec that filters out what you want to show. Note that the filter is sent to the device and processed there. It’s use of wildcards is limited. Please note also that the command-line processes wildcards on its own. Thus, to be sure that the filespec is processed correctly, include it in quotation marks!
In order to specify the drive to use on a dual-drive floppy (i.e., 8050, 8250), you can append the number as file spec.
Examples:
cbmctrl dir 8
cbmctrl dir 8 0
cbmctrl dir 8 1
cbmctrl dir 8 "ABC*"
cbmctrl dir 8 "1:ABC*"
cbmctrl dir 8 "250/cmd_dir/:ABC*"
download device address count [file]
Read count bytes from drive memory, starting at address via one or more M-R commands. Memory contents are written to standard output if file is "-" or ommited.upload device address [file]
Send file to drive memory, starting at address via one or more M-W commands. If address is -1, the first two bytes from file are considered as start address. Reads standard input if file is "-" or ommited.change device
Wait for a disk to be changed in the specified device. It waits for the current disk to be removed, for a new disk to be inserted and for the drive door to be closed. It does not return until the disk is ready to be read or written.
cbmctrl Examples
Send file contents to printer 4:
cbmctrl lock
cbmctrl listen 4 0
cbmctrl write file
cbmctrl unlisten
cbmctrl unlock
Copy file to disk drive 8:
cbmctrl lock
cbmctrl open 8 2 FILENAME,P,W
cbmctrl listen 8 2
cbmctrl write file
cbmctrl unlisten
cbmctrl close 8 2
cbmctrl unlock
Copy file from disk drive 8:
cbmctrl lock
cbmctrl open 8 2 FILENAME,P,R
cbmctrl talk 8 2
cbmctrl read file
cbmctrl untalk
cbmctrl close 8 2
cbmctrl unlock
Dump 1541 ROM:
cbmctrl download 8 0xc000 0x4000 > 1541.rom
or
cbmctrl download 8 0xc000 0x4000 1541.rom
Write file buffer2.bin to drive 9, address 0x500:
cbmctrl upload 9 0x500 buffer2.bin
7.3 cbmformat
cbmformat is a fast low-level disk formatter for the 1541 and compatible devices (1570, 1571, third-party clones). A 1581 drive is not supported.
The drive routine was taken from the Star Commander ((C) Joe Forster/STA) and highly improved.
There is also another, very similar tool, cbmforng.
cbmformat invocation
Synopsis: cbmformat [OPTION]... DRIVE# NAME,ID
DRIVE# has to be the drive number of the disk drive, NAME is a name with up to 16 characters which will be the name of the disk after formatting, ID is the 2-letter disk ID.
Note: Unlike the N0 command of the drive, the ID must be given (thus, no so-called “short format” is possible).
Here’s a complete list of known options:-h, –help
Display help and exit.-V, –version
Display version information and exit.-@, –adapter=<plugin>[:<bus>]
Specify the plugin to use. If you have installed more than one plugin (XA1541, XU1541, XUM1541), you can specifiy which one to use for this command. This way, you can use all three variants at the same time.
This requires an argument of the form <plugin>[:<bus>], where <plugin> is the plugin’s backend name (currently: xa1541, xu1541, xum1541), and <bus> is the bus identifier, if it is supported by the backend.-n, –no-bump
Do not bump drive head at the beginning. Don’t use this on eventually misaligned drives.-x, –extended
Format a 40 track disk, the BAM format is compatible to SpeedDOS.-c, –clear
clear (demagnetize) this disk. This is highly recommended if the disk is used for the first time, or if it was previously formatted for another system (i.e., MS-DOS). Note that this option takes much time.-v, –verify
verify each track after it is written. As this needs an extra round of the drive for each track, the formatting time is almost doubled.
cf. cbmformat Notes for 1571 drives-o, –original
Fill sectors with the original pattern (0x4b, 0x01, 0x01…) instead of zeroes. The original pattern is probably due to a bug in the drive ROM, apart from this, zeroing out unused sectors should give (slightly) better results for compressed disk images.
cf. cbmformat Notes for 1571 drives-s, –status
Display drive status after formatting. Normally, cbmformat exits after executing the drive code. With this option turned on, cbmformat waits until the drive has finished formatting and prints the drive status after initializing the BAM on standard out.-p, –progress
Display a hash mark (‘#’) for each formatted track. Slows formatting down a bit.
cbmformat Notes for 1571 drives
We encountered problems with decent revision/mechanics combinations of the 1571 disk drives when using cbmformat. We highly recommend to use –original and –verify with 1571 drives. From our experience, with –original, the problem does not occur; with –verify, the drive tests each track after it was formatted and ensures that the failure condition did not occur.
We did not encounter these problems with either of 1541 (1541-II, 1541C), 1570 or 1571CR (the drive which is part of the C128DCR) drives, only with original 1571 drives.
In the current state, cbmformat is not able to format double-sided disks on a 1571 drive.
cbmformat Examples
Format standard disk (35 tracks) in drive 8:
cbmformat 8 GAMES,42
Format standard disk (35 tracks) in drive 9, use (buggy) 1541 sector pattern (for example, because this is a 1571 drive), show drive status when done:
cbmformat -os 9 1571disk,71
SpeedDOS disk (40 tracks), show progress indicator, all sectors zeroed out, no head banging:
cbmformat -npx 8 "40 TRACKS,OK"
7.4 cbmforng
cbmforng is a fast and reliable low-level disk formatter for the 1541 and compatible devices (1570, 1571, third-party clones). It was based on cbmformat and is designed to become the designated successor to cbmformat, therefore its name: CBM-Formatter, the Next Generation.
cbmforng does not support a 1581 drive.
Because this is the first official release of cbmforng and because it was not used in the field by a wider user group, it still contains additional measurement routines and informational output after the formatting process was done. When cbmforng prooved its matureness and got back some features currently missing (progress bar), it will replace cbmformat.
To date cbmforng should be considered as the more reliable formatter of both; whenever you should encounter any difficulties with cbmformat, go for cbmforng. If you like additional informational messages like e.g. the RPM value each formatted track was measured, then cbmforng is the tool you want to use. Your feedback helps us to decide, if this additional output which was needed for developing may find its way into future releases.
cbmforng invocation
Synopsis: cbmforng [OPTION]... DRIVE# NAME,ID
DRIVE# has to be the drive number of the disk drive, NAME is a name with up to 16 characters which will be the name of the disk after formatting, ID is the 2-letter disk ID.
Note: Unlike the N0 command of the drive, the ID must be given (thus, no so-called “short format” is possible).
Here’s a complete list of known options:-h, –help
Display help and exit.-V, –version
Display version information and exit.-@, –adapter=<plugin>[:<bus>]
Specify the plugin to use. If you have installed more than one plugin (XA1541, XU1541, XUM1541), you can specifiy which one to use for this command. This way, you can use all three variants at the same time.
This requires an argument of the form <plugin>[:<bus>], where <plugin> is the plugin’s backend name (currently: xa1541, xu1541, xum1541), and <bus> is the bus identifier, if it is supported by the backend.-n, –no-bump
Do not bump drive head at the beginning. Don’t use this on eventually misaligned drives.-r, –retries n
Set the maximum number of retries on errors. This accounts for all errors that may happen when formatting all the tracks of the whole disk.-x, –extended
Format a 40 track disk, the BAM format is compatible to SpeedDOS.-c, –clear
clear (demagnetize) this disk. This is highly recommended if the disk is used for the first time, or if it was previously formatted for another system (i.e., MS-DOS). Note that this option takes much time.-v, –verify
verify each track after it is written. As this needs an extra round of the drive for each track, the formatting time is almost doubled.
cf. cbmforng Notes for 1571 drives-o, –original
Fill sectors with the original pattern (0x4b, 0x01, 0x01…) instead of zeroes. The original pattern is probably due to a bug in the drive ROM, apart from this, zeroing out unused sectors should give (slightly) better results for compressed disk images. In comparison to cbmformat, the pattern used with cbmforng is a little bit more original than the one from its predecessor. On track one the pattern consists of: 0x00, 0x01, 0x01, … instead of the first byte beeing 0x4b. This perfectly reflects the original 1541 ROM format bug.
cf. cbmforng Notes for 1571 drives-s, –status
In addition to the informational output of internal values from the formatting process, the drive status is displayed.
cbmforng Notes for 1571 drives
We encountered rare failure conditions with decent revision/mechanics combinations of the 1571 disk drives when using cbmforng. We highly recommend to use –original and –verify with 1571 drives. From our experience, with –original, the problem does not occur. With –verify, the drive tests each track after it was formatted and ensures that the failure condition did not occur; otherwise the same track is formatted again, as often as the currently set retry value allows.
We did not encounter these problems with either of 1541 (1541-II, 1541C), 1570 or 1571CR (the drive which is part of the C128DCR) drives, only with original 1571 drives.
In the current state, cbmforng is not able to format double-sided disks on a 1571 drive.
cbmforng Examples
Format standard disk (35 tracks) in drive 8:
cbmforng 8 GAMES,42
Format standard disk (35 tracks) in drive 9, use (buggy) 1541 sector pattern (for example, because this is a 1571 drive), show drive status when done:
cbmforng -os 9 1571disk,71
SpeedDOS disk (40 tracks), verify formatted tracks, all sectors zeroed out, no head banging:
cbmforng -nvx 8 "40 TRACKS,OK"
7.5 d64copy
d64copy is a fast disk image transfer (both read and write) program for the 1541 and compatible devices (1570, 1571, third-party clones). A 1581 drive is not supported! Maximum transfer speed is achieved by custom drive- and transfer-routines based on the Star Commander ((C) Joe Forster/STA) routines.
d64copy invocation
Synopsis: d64copy [OPTION]... SOURCE TARGET
Either SOURCE or TARGET must be an external drive, valid names are 8, 9, 10 and 11. The other parameter specifies the file name of the .d64 image.
Here’s a complete list of known options:-h, –help
Display help and exit-V, –version
Display version information and exit.-@, –adapter=<plugin>[:<bus>]
Specify the plugin to use. If you have installed more than one plugin (XA1541, XU1541, XUM1541), you can specifiy which one to use for this command. This way, you can use all three variants at the same time.
This requires an argument of the form <plugin>[:<bus>], where <plugin> is the plugin’s backend name (currently: xa1541, xu1541, xum1541), and <bus> is the bus identifier, if it is supported by the backend.-q, –quiet
Quiet output, fewer messages (also suppresses warnings, should not be used)-v, –verbose
Verbose output, more messages (can be repeated)-n, –no-progress
Omit progress display-s, –start-track=start track
Set start track (defaults to 1)-e, –end-track=End track
Set end track (default is 35 for .d64 images, 70 for .d71 images). d64copy is able to access tracks 1-35 in original transfer mode and 1-42 with serial1, serial2 and parallel. The 1571 supports tracks 1-70 in double sided (.d71) mode.-t, –transfer=transfer mode
Set transfermode. Valid modes are:
auto(default)original(slowest)serial1serial2parallel(fastest)
original and serial1 should work in any case. serial2 won’t work with more than one device connected to the IEC bus, parallel requires an additional XP1541/XP1571 cable.
If auto is used, d64copy itself determines the best transfer mode usable with the current setup, and uses that one. Thus, you will seldom want to manually overdrive the transfer mode option.-i, –interleave=interleave
Set interleave value. This is ignored when reading in warp mode. Default is 16 for transfer mode original, for turbo and warp write as follows:
          turbo (r/w)    warp (write only)
serial1       3                 5
serial2      12                11
parallel      6                 3
Lower values might slightly reduce transfer times, but if set a bit to low, transfer times will dramatically increase.-w, –warp
Enable warp mode. This is default now; this option is only supported for backward-compatibility with OpenCBM (cbm4linux/cbm4win) versions before 0.4.0.–no-warp
Disable warp mode. Warp mode is usually a good idea for transferring disk images unless you have a very slow CPU and/or bad disk material. Warp mode sends raw GCR data over the bus, which assures data integrity on the PC side and relieves the drive’s CPU. Thus, it is unlikely you will want to use that option.-b, –bam-only
BAM-only copy. Only blocks marked as allocated are copied. For extended tracks (36-40), SpeedDOS BAM format is assumed. Use with caution, at least one wide-spread directory editor tends to forget to allocate some directory blocks.-B, –bam-save
Safe BAM-only copy. This is like the -b option but always copies the entire directory track (18, 18 and 53 in double-sided mode).-d, –drive-type=type
Skip drive type detection. 0 or 1541 specifies 1541 mode (1 MHz, parallel cable at VIA $1800), 1 or 1571 forces 1571 mode (2 MHz, parallel cable at CIA $4000).-2, –two-sided
Double-sided mode for copying .d71 images to/from a 1571 drive. Warp mode is not supported (yet).-r, –retry-count=count
Number of retries.-E, –error-map=mode
Controls whether error is appended to the disk image (15×1->PC only). Allowed values for mode are (abbreviations allowed):
alwayson_error(default)never
d64copy Examples
Read a D64 disk image from the floppy in drive 8 to the file image.d64, automatically selecting the fastest transfer method:
d64copy 8 image.d64
Copy the D64 disk image in image.d64 to the floppy in drive 9, automatically selecting the fastest transfer method:
d64copy image.d64 9
Copy a double-sided disk from a 1571 drive 9 to image.d71, using serial1 transfer method and only reading the blocks which are marked as used in the BAM:
d64copy -2 -B --transfer=serial1 9 image.d64
7.6 d82copy
d82copy is a fast disk image transfer (both read and write) program for the 8050, 8250 and SFD 1001.
d82copy invocation
Synopsis: d82copy [OPTION]... SOURCE TARGET
Either SOURCE or TARGET must be an external drive, valid names are 8, 9, 10 and 11. The other parameter specifies the file name of the .d80 or .d82 image.
Here’s a complete list of known options:-h, –help
Display help and exit-V, –version
Display version information and exit.-@, –adapter=<plugin>[:<bus>]
Specify the plugin to use. If you have installed more than one plugin (XA1541, XU1541, XUM1541), you can specifiy which one to use for this command. This way, you can use all three variants at the same time.
This requires an argument of the form <plugin>[:<bus>], where <plugin> is the plugin’s backend name (currently: xa1541, xu1541, xum1541), and <bus> is the bus identifier, if it is supported by the backend.-q, –quiet
Quiet output, fewer messages (also suppresses warnings, should not be used)-v, –verbose
Verbose output, more messages (can be repeated)-n, –no-progress
Omit progress display-s, –start-track=start track
Set start track (defaults to 1)-e, –end-track=End track
Set end track (default is 77 for .d80 images, 154 for .d82 images).-t, –transfer=transfer mode
Set transfermode. Valid modes are:
auto(default)original(slowest)
If auto is used, d82copy itself determines the best transfer mode usable with the current setup, and uses that one. Thus, you will seldom want to manually overdrive the transfer mode option.
Note that d82copy currently only supports original mode; thus, either auto or omitting the transfer mode will both default to original.-i, –interleave=interleave
Set interleave value. This is ignored when reading in warp mode. Default is 16 for transfer mode original, for turbo and warp write as follows:
original 22
Lower values might slightly reduce transfer times, but if set a bit to low, transfer times will dramatically increase.-w, –warp
Enable warp mode. This is default now; this option is only supported for backward-compatibility with OpenCBM (cbm4linux/cbm4win) versions before 0.4.0.
Note that d82copy currently supports original transfer mode only; thus, –warp and –no-warp are ignored at the moment.–no-warp
Disable warp mode. Warp mode is usually a good idea for transferring disk images unless you have a very slow CPU and/or bad disk material. Warp mode sends raw GCR data over the bus, which assures data integrity on the PC side and relieves the drive’s CPU. Thus, it is unlikely you will want to use that option.
Note that d82copy currently supports original transfer mode only; thus, –warp and –no-warp are ignored at the moment.-b, –bam-only
BAM-only copy. Only blocks marked as allocated are copied.-B, –bam-save
Safe BAM-only copy. This is like the -b option but always copies the entire directory track (18, 18 and 53 in double-sided mode).-d, –drive-type=type
Skip drive type detection. Possible values are: 8050, 8250 or 1001.-1, –one-sided
Single-sided mode (D80).-2, –two-sided
Double-sided mode (D82); requires a VIC 8250 or SFD 1001 drive.-r, –retry-count=count
Number of retries.-E, –error-map=mode
Controls whether error is appended to the disk image (15×1->PC only). Allowed values for mode are (abbreviations allowed):
alwayson_error(default)never
d82copy Examples
Read a D82 disk image from the floppy in drive 8 to the file image.d82, automatically selecting the fastest transfer method:
d82copy -2 8 image.d82
Copy the D80 disk image in image.d80 to the floppy in drive 9, automatically selecting the fastest transfer method:
d82copy -1 image.d80 9
Copy a double-sided disk from a 1001 drive 9 to image.d82, only reading the blocks which are marked as used in the BAM:
d82copy -2 -B --drive-type=1001 9 image.d82
7.7 imgcopy
imgcopy is a fast disk image transfer (both read and write) program for various CBM disk drives, namely, VIC 1540, 1541, 1570, 1571, 1581, 2031, 2040, 3040, 4031, 4040, 8050, 8250, and SFD 1001.
imgcopy invocation
Synopsis: imgcopy [OPTION]... SOURCE TARGET
Either SOURCE or TARGET must be an external drive, valid names are 8, 9, 10 and 11. The other parameter specifies the file name of the image file.
The extension of the image file determines the default Imagefiletype (.d64, .d71, .d80, .d81, .d82)
.d641540, 1541, 1570, 1571 (single-sided) or 2031 image.d711571 image (double-sided).d811581 image.d808050 image (single-sided).d828250 or 1001 image (double-sided)
Here’s a complete list of known options:-h, –help
Display help and exit-V, –version
Display version information and exit.-@, –adapter=<plugin>[:<bus>]
Specify the plugin to use. If you have installed more than one plugin (XA1541, XU1541, XUM1541), you can specifiy which one to use for this command. This way, you can use all three variants at the same time.
This requires an argument of the form <plugin>[:<bus>], where <plugin> is the plugin’s backend name (currently: xa1541, xu1541, xum1541), and <bus> is the bus identifier, if it is supported by the backend.-q, –quiet
Quiet output, fewer messages (also suppresses warnings, should not be used)-v, –verbose
Verbose output, more messages (can be repeated)-n, –no-progress
Omit progress display-s, –start-track=start track
Set start track (defaults to 1)-e, –end-track=End track
Set end track (default depends upon the file image type).-t, –transfer=transfer mode
Set transfermode. Valid modes are:
auto(default)original(slowest)serial1serial2serial3parallel(fastest)
Not all modes are supported with all drives!
If auto is used, imgcopy itself determines the best transfer mode usable with the current setup, and uses that one. Thus, you will seldom want to manually overdrive the transfer mode option.-i, –interleave=interleave
Set interleave value. This is ignored when reading in warp mode. The default depends upon the file image type.
Lower values might slightly reduce transfer times, but if set a bit to low, transfer times will dramatically increase.-w, –warp
Enable warp mode. This is default now; this option is only supported for backward-compatibility with OpenCBM (cbm4linux/cbm4win) versions before 0.4.0.–no-warp
Disable warp mode. Warp mode is usually a good idea for transferring disk images unless you have a very slow CPU and/or bad disk material. Warp mode sends raw GCR data over the bus, which assures data integrity on the PC side and relieves the drive’s CPU. Thus, it is unlikely you will want to use that option.-b, –bam-only
BAM-only copy. Only blocks marked as allocated are copied.-B, –bam-save
Safe BAM-only copy. This is like the -b option but always copies the entire directory track (18, 18 and 53 in double-sided mode).-d, –drive-type=type
Skip drive type detection. Possible values are: 1541, 1571, 1581, 2031, 2040, 3040, 4031, 4040, 8050, 8250 or 1001.-1, –one-sided
Single-sided mode (D80).-2, –two-sided
Double-sided mode (D82); requires a VIC 8250 or SFD 1001 drive.-r, –retry-count=count
Number of retries.-E, –error-map=mode
Controls whether error is appended to the disk image (15×1->PC only). Allowed values for mode are (abbreviations allowed):
alwayson_error(default)never
imgcopy Examples
7.8 cbmcopy
cbmcopy is a fast file transfer program for various disk drives, in particular the 1541, 1570, 1571 and 1581 devices. Maximum transfer speed is achieved by custom drive- and transfer-routines based on the Star Commander ((C) Joe Forster/STA) routines.
cbmcopy invocation
Synopsis: cbmcopy [OPTION]... DEVICE# FILE...
DEVICE# specifies the drive number for file copy. The remaining arguments specify the files to be sent to/read from the disk drive. This version supports Raw, PC64 (P00) and T64 files. They are recognized when sending files to the disk drive, files read from external devices are always stored as raw binary data.
Here’s a complete list of known options:-h, –help
Display help and exit-V, –version
Display version information and exit.-@, –adapter=<plugin>[:<bus>]
Specify the plugin to use. If you have installed more than one plugin (XA1541, XU1541, XUM1541), you can specifiy which one to use for this command. This way, you can use all three variants at the same time.
This requires an argument of the form <plugin>[:<bus>], where <plugin> is the plugin’s backend name (currently: xa1541, xu1541, xum1541), and <bus> is the bus identifier, if it is supported by the backend.-q, –quiet
Quiet output, fewer messages (also suppresses warnings, should not be used)-v, –verbose
Verbose output, more messages (can be repeated)-n, –no-progress
Omit progress display-r, –read
Operate in read-mode, i.e. read data from an external device. Starting cbmcopy as cbmread has the same effect.-w, –write
Operate in write-mode, i.e. send files to an external device. Starting cbmcopy as cbmwrite has the same effect.-t, –transfer=transfer mode
Set transfermode. Valid modes are:
auto(default)serial1(slowest)serial2parallel(fastest, not possible with a 1581)
serial1 should work in any case. serial2 won’t work with more than one device connected to the IEC bus, parallel requires a XP1541/XP1571 cable in addition to the XM/XA1541. If auto is given, or this option is completely omitted, cbmcopy will automatically determine the fastest transfer method possible with the current setup. Thus, you will seldom want to manually overdrive the transfer mode option.-d, –drive-type=type
Skip drive type detection. Valid types are 1541, 1570, 1571 and 1581.-o, –output=name
Specifies target name. ASCII/PetSCII conversion is performed when in write-mode.-a, –address=address
Overrides the file’s first two bytes with address.-R, –raw
Skip file type detection. File data is sent as is. This option is only valid in write-mode.-f, –file-type=type
Specifies/overrides file type. Supported types are P, S, D, U. Raw files default to P, whereas the T64 format contains meta data which includes the file type. For PC64 files, cbmwrite tries to guess the file type from the file extension. This option is only valid in write-mode.
cbmcopy Examples
Read a file called cbmfile from drive 8 and store its binary value into the file file.bin, automatically selecting the fastest transfer method:
cbmcopy -r 8 cbmfile -o file.bin
Write out the file file.p00 in P64 format to the disk in drive 9, using serial1 transfer method:
cbmcopy -w 9 file.p00
7.9 rpm1541
rpm1541 is a demo program. It finds out the rotation speed (in rounds per minute, rpm) of the drive motor. rpm1541 supports a 1541, 1570 or 1571 drive. A 1581 drive is not supported.
For Linux, rpm1541 is not installed automatically. You have to compile it yourself (found in demo/rpm1541/) if you want to use it. For Windows, it is part of the binary distribution.
This demo program does not allow you to specify a specific adapter/plugin. Instead, it always uses the default plugin.
rpm1541 usage
Synopsis: rpm1541 [device]
The optional parameter device is the device number of the drive which should be tested. If not specified, rpm1541 utilizes drive 8.
rpm1541 Example
Find out the rotation speed of drive 11:
cbmctrl lock
rpm1541 11
cbmctrl unlock
7.10 flash
flash is a demo program. It flashes the drive LED. flash works with 1541, 1570 or 1571 drives. A 1581 drive is not supported.
For Linux, flash is not installed automatically. You have to compile it yourself (found in demo/flash/) if you want to use it. For Windows, it is part of the binary distribution.
This demo program does not allow you to specify a specific adapter/plugin. Instead, it always uses the default plugin.
flash usage
Synopsis: flash [device]
The optional parameter device is the device number of the drive which should flash its LED. If not specified, flash utilizes drive 8.
flash Example
Let the drive LED flash on drive 10:
cbmctrl lock
flash 10
cbmctrl unlock
7.11 morse
morse is a demo program. It uses the drive LED to output a text in morse code. morse works with 1541, 1570 or 1571 drives. A 1581 drive is not supported.
For Linux, morse is not installed automatically. You have to compile it yourself (found in demo/morse/) if you want to use it. For Windows, it is part of the binary distribution.
This demo program does not allow you to specify a specific adapter/plugin. Instead, it always uses the default plugin.
morse usage
Synopsis: morse [device]
The optional parameter device is the device number of the drive which should flash its LED. If not specified, morse utilizes drive 8.
morse Examples
Morse the text “SOS”, “HELLO” and “YOU” (in this order) on drive 9.
cbmctrl lock
morse 9
cbmctrl command 9 U3:HELLO
cbmctrl command 9 U3:YOU
cbmctrl unlock
7.12 cbmlinetester
This tool can be used for debugging purposes. You can use it to test and check if the IEC lines react on actions of the PC.
cbmlinetester invocation
Synopsis: cbmlinetester [OPTION]
Set the IEC lines to specific values
Here’s a complete list of known options:-h, –help
display help and exit-V, –version
display version information and exit-@, –adapter=<plugin>[:<bus>]
Specify the plugin to use. If you have installed more than one plugin (XA1541, XU1541, XUM1541), you can specifiy which one to use for this command. This way, you can use all three variants at the same time.
This requires an argument of the form <plugin>[:<bus>], where <plugin> is the plugin’s backend name (currently: xa1541, xu1541, xum1541), and <bus> is the bus identifier, if it is supported by the backend.-i, –interactive
Use the tool interactively (only with ncurses)-p, –poll
Poll the values of the lines-r, –reset
set the RESET line (set to 0V)-R, –RESET
release the RESET line (set to 5V)-a, –atn
set the ATN line (set to 0V)-A, –ATN
release the ATN line (set to 5V)-c, –clock
set the CLOCK line (set to 0V)-C, –CLOCK
release the CLOCK line (set to 5V)-d, –data
set the DATA line (set to 0V)-D, –DATA
release the DATA line (set to 5V)
7.13 tape routines
For Windows, special tape routines are available for use with the ZoomFloppy cable. Currently, the only documentation for this can be found in the source tarball at opencbm/tape/.
8. OpenCBM API
The OpenCBM API is documented as doxygen file. You can find it only on https://opencbm.trikaliotis.net/doxygen/
9. Known bugs and problems
There are some known bugs and limitations in OpenCBM:
- cbmcopy is still known to have some protocol races, especially with 1581 drives; thus, it does not always work reliably.
- cbmctrl detect as well as cbmcopy and d64copy do not recognize the drive type if some custom ROM is used. Whenever this happens, use –drive-type for cbmcopy and d64copy. Furthermore, I would be happy if you could send me a ROM dump of the floppy ROM so I can update the drive type recognition for some future version of OpenCBM.
- Windows with XA1541/XM1541: If you have any other devices connected to your parallel port, you cannot use them as long as OpenCBM is installed. In this case, either remove OpenCBM whenever you want to access that other device, or install OpenCBM with instcbm –lock=no and make sure to issue cbmctrl lock before accessing the drive, and cbmctrl unlock afterwards.
- Windows with XA1541/XM1541: No third party PCI or PCIe parallel port card does work with OpenCBM on Windows currently; to say it with other words: there is no proof or positive report that any third party PCI or PCIe parallel port card does or did work with OpenCBM on Windows. The exact failure reason is not known to date, but we are investigating further since that feature is a must, when integrated parallel ports were removed from mainstream mainboards in the future. Thus, it would be best if you use XU1541 or XUM1541 adapters instead of XA1541 and XM1541!
- Linux with XA1541/XM1541: PCI or PCIe based parallel port cards might work, but there is no guarantee for this. Thus, it would be best if you use XU1541 or XUM1541 adapters instead of XA1541 and XM1541!
- All with XA1541/XM1541: An XA1541 or XM1541 cable will definitely not work with a USB-to-parallel-port adapter. These are commonly used to connect parallel port printers to modern PCs. However, neither do they offer full access to all parallel port lines, as it is needed for the XA1541/XM1541 cables, nor do they allow for the tight timing needed for XA1541/XM1541 cables.
- Windows: The Star Commander is supported on 32 bit versions of Windows. For this, a special VXD driver is installed. The Star Commander then uses the VXD to communicate with the drive. This does not work for 64 bit Windows variants, though.
10. WARNINGS
You should be careful when operating the adapters, in order to prevent any damage to your drive or your adapter. The following general rules apply to all of the XA1541, the XM1541, the XU1541 and the XUM1541 (ZoomFloppy) devices, unless specified otherwise.
- Do not plug or unplug any cables to the floppy drive when the drive is powered on or the XU1541, XUM1541, or ZoomFloppy is connected to a PC via USB, or the XA1541 is connected to the PC via the parallel port. When the USB based adapters are plugged into USB, they are powered on and could zap your drive if you connect or remove a floppy drive. This is also the same way you should treat floppy drives attached to your Commodore computers.
- Do not attach more than 4 floppy drives to a single ZoomFloppy. For the other adapters (XU1541, general XUM1541, XA1541 or XM1541), other limits may be valid. If you need more drives, get another ZoomFloppy or other adapter. The OpenCBM softare allows you to use more than one adapter at the same time (subject to PC performance limitations). These can be multiple adapters of the same type, or of different ones.
- Do not connect more than one drive to the XU1541, XUM1541, ZoomFloppy, or XAP1541/XMP1541 parallel ports. While there are multiple connectors, only one should be used at a time. Otherwise, chances are you will damage your floppy drive!
- When accessing floppy drives, all devices connected to the same IEC bus must be turned on. Even if you are only going to use one drive, for example, all other connected drives must also be turned on. Unpowered IEC devices may interfere with proper operation of other drives.
- Be careful of static electricity discharge when plugging/unplugging any electronic components. Consider getting a case for your XU1541, XUM1541 or ZoomFloppy board if you are concerned about the environment you will be using it on.
10.1 Proper power-on sequence
We have tested leaving the XU1541, XUM1541, ZoomFloppy, XA1541 or XM1541 adapters connected to powered-on drives for days with no problems, even though they were not connected via USB or via the PC’s parallel port. You can also leave the adapters plugged into USB with the drive(s) off with no problems. But while the ZoomFloppy is designed to be robust, you can avoid unnecessary wear by following these instructions for starting up and shutting it down. Other adapters (XU1541, other XUM1541 variants, XA1541 or XM1541) may be even more picky than the ZoomFloppy.
Power-on sequence for USB based adapters
For USB based adapters (XU1541, XUM1541, ZoomFloppy), the following procedure is recommended:
- Start with drive off and XU1541, XUM1541, ZoomFloppy unplugged from the PC’s USB;
- Plug in all cable(s) between XU1541, XUM1541, ZoomFloppy and drive(s);
- Plug in XU1541, XUM1541 or ZoomFloppy via USB;
- Turn on drive power switch(es).
Turn off the equipment via the same sequence in reverse, at least doing steps 4 and 3. You don’t need to unplug the floppy drive from XU1541, XUM1541 or ZoomFloppy while not in use.
The 15×1 drives with an internal power supply tend to get hot if left on for a long time, so you may want to power them off when not in use.
Power-on sequence for PC parallel port based adapters
For the parallel port based adapters (XA1541, XM1541, XAP1541, XMP1541), the following procedure is recommended:
- Start with drive off and XA1541, XM1541, XAP1541 or XMP1541 unplugged from the PC’s parallel port. Furthermore, leave the PC switched off;
- Plug in all cable(s) between XA1541, XM1541, XAP1541 or XMP1541 and drive(s);
- Plug in XA1541, XM1541, XAP1541 or XMP154 to the PC’s parallel port;
- Turn on the PC
- Turn on drive power switch(es).
Turn off the equipment via the same sequence in reverse, at least doing steps 5, 4 and 3. It is highly suggested to unplug the floppy drive(s) from the parallel port while not in use, by removing the XA1541, XM1541, XAP1541 or XMP1541 adapter from the PC, at least.
The 15×1 drives with an internal power supply tend to get hot if left on for a long time, so you may want to power them off when not in use.
11. Misc
11.1 Credits
The fast format drive routine used by the original `cbmformat’ and the turbo and warp drive routines used in `libd64copy’ and `libcbmcopy’ are heavily based on Joe Forster/STAs Star Commander routines. The `cbmformat’ routines were highly modified afterwards. The `cbmforng’ drive routine is derived from this, but was a massive rewrite by Wolfgang Moser.
The XP1541 and XP1571 cables (C) by Joe Forster/STA. The original XE1541 cable (C) by Nicolas Welte and Wolfgang Moser The XA1541 cable (C) by Michael Klein and Nicolas Welte The XU1541 cable is copyright by a person who does not want to be mentioned anymore. The XUM1541 / ZoomFloppy cable is (C) Jim Brain and Nate Lawson.
11.2 Contributions
People who directly or indirectly contributed to OpenCBM (in no particular order):
- Michael Klein started the original cbm4linux work (which was a very big part)
- Joe Forster/STA made the Star Commander and supplied the source and info about the X?1541 interfaces; who knows, without this work, OpenCBM might never have appeared at all.
- Nicolas Welte helped with the XA1541 and XM1541 interfaces and supplied a free factory-new 1571 mechanic for Michael
- Andreas Boose & the VICE team made VICE
- André Fachat made the xa 6502 crossassembler
- Ullrich von Bassewitz made the ca65 crossassembler as part of the cc65 package
- Oliver Schmidt took over the cc65 package (and, thus, the ca65 crossassembler) after Ullrich von Bassewitz retired from supporting it.
- Wolfgang Moser contributed many discussions, patches, and hardware whenever it was needed.
- Spiro Trikaliotis with discussions, lots of fixes and doing an overall great review while porting the driver to “other” operating systems 😉
- Andreas Senk reported a problem with IEC2IEEE and donated an IEC2IEEE device. This led to the discovery of a severe protocol bug in the implementation of OpenCBM.
- Jochen Adler, author of IEC2IEEE, helped in debugging the problem Andreas Senk reported (cf. above).
- Christian Vogelgsang made the MacOS port and documented it.
- A person who does not want to be mentioned anymore for building the XU1541 device as low-cost variant and proof-of-concept that such a communication tool can be built as USB device.
- Nate Lawson for building the XUM1541 firmware, especially for the ZoomFloppy, in a collaborative effort with Jim Brain who built the ZoomFloppy hardware, which is the standard and best tested implementation of the XUM1541 device. Uffe Jakobsen worked on FreeBSD ports and MacOS variants, and fixed many other things especially for Linux.
- Frédéric Brière made some enhancements especially for the Linux kernel module for the XA1541/XM1541 devices.
- Markus Brenner wrote mnib, a parallel nibbler for DOS, that was later ported by Arnd Menge to also work with OpenCBM on Windows and Linux.
- Peter ‘Pete’ Rittwage took over mnib, renamed it to nibtools, and still supports it.
- Arnd Menge not only ported mnib to the OpenCBM environment, he also made many changes in many aspects, especially for the Windows version, for the support of tape drives, and many other small and big things. He also added the SRQ nibbling support which allows to use the nibtools without a parallel connection for some drives.
- Thomas `Tommy’ Winkler wrote d82copy and imgcopy and implemented IEEE-488 support for the XUM1541.
- Jochen Adler for the IEC2IEEE device http://www.nlq.de/ and for sending me free hardware in order to test it with my SFD1001 and VIC 8250LP.
- Andrea Musuruane helped in making the Linux udev rules more robust.
- David Riley and Matt Dainty worked on the MacOS X port and installation
- Olli Savia fixed some memory issues which resulted in overwritten memory areas
- Henning Pingel fixed some build issues
- Martin Thierer did a lot in order to debug nasty USB problems with the XUM1541 devices
- Felix Palmen worked on the FreeBSD port and fixed some portability issues
- Dennis Ahrens and Peter Stuge did the work to port the USB plugins to libusb 1.0, moving away from the outdated libusb-0.1 API.
- and anyone else who sent patches, suggestions, praises & flames!
11.3 Feedback
Feel free to drop a note if you have ideas, patches etc. or if you just want to tell how happy you are with this program 😉
If possible, we would prefer if you send bug reports, patches and wishlist itemts to the GitHub tracker on https://github.com/OpenCBM/OpenCBM/issues, and general discussions on the SourceForge mailing list `opencbm-user’ on https://sourceforge.net/p/opencbm/mailman/.
Have fun,
The OpenCBM team.