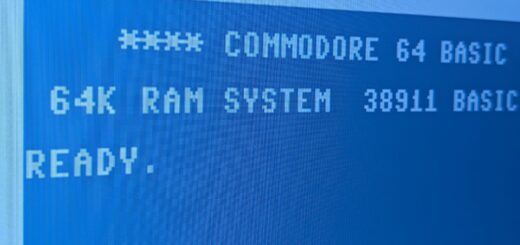
TeensyROM!
What is it? (the overview)

A cartridge emulator based on the Teensy 4.1. You load it up with .crt, or .prg files, and you can then load programs quicklike from the device’s onboard menu. Like a Pi1541 mimics the floppy drive’s functionality, this mimics a program cartridge. Only, because it’s using a microcontroller at its heart, it’s capable of a lot more than just that!
It also supports a NFC card writer/reader accessory for fast load triggering, and a Windows PC-based UI control for better library management and access!
The TeensyROM features:
Super fast Loading (.PRG/P00) or ROM emulation (.CRT) directly from:
- USB thumb Drive
- SD card
- Teensy Internal Flash Memory
- Transfer directly from PC using the TeensyROM UI
MIDI in/out via USB Host connection:
- Play your SID with a USB MIDI keyboard!
- Use with popular software such as Cynthcart, Station64 etc, or the included MIDI2SID app
- Supports all regular MIDI messages in and out
- Can use your C64 to play a MIDI sound capable device.
- Sequential, Datel/Siel, Passport/Sentech, and Namesoft MIDI cartridges emulated
- Use a USB Hub for multiple instruments+thumb drive access
MIDI in via USB Device connection:
- Stream .SID or .MIDI files from a modern computer directly to your Commodore machine SID chip!
- Play MIDI files out of your PC into C64 apps such as Cynthcart or the MIDI2SID app
- Stream .SID files out of your PC using the ASID MIDI protocol to hear any SID file on original hardware.
Internet communication via Ethernet connection
- Connect to your favorite C64/128 Telnet BBS!
- Use with released software such as CCGMS, StrikeTerm2014, DesTerm128, etc (pre-configured CCGMS is included with the initial firmware image)
- Swiftlink cartridge + 38.4k modem emulation
- Send AT commands from terminal software to configure the Ethernet connection
- Sets C64 system time from internet
Firmware updates directly from SD card or USB thumb drive
- Just drop the .hex file on an SD card or USB drive, no need for extra software to update.
Key parameters stored in internal EEPROM
- Startup, Ethernet, timezone, etc retained after power down.
Background
One of the exciting aspects of maintaining an interest in an old platform like the Commodore 64, is taking part in the stream of ideas and innovations that get churned out by the community, and recently, there seems to be a lot of thought being put into making the program management experience better, or at least more reliable.

For example, the biggest drawback of trying to rekindle the nostalgia of using a Commodore 64 is that the original 1541 floppy drive was pretty crap, and “The Experience” is dimmed by blowing a huge chunk of time doing nothing but watching a loading screen. The 1541 was released with serious flaws that limited its read and write speeds, flaws which would barely be recgonized and addressed by the likes of JiffyDOS before the 1541 drive was effectively abandoned by Commodore for newer models that, tragically, were either just as limited, or simply came around too late to make a difference for the 64.
In this day and age, the patience required to let that cantankerous behemoth do its simple data transfer tasks is rather hard to come by. It was one thing to deal with it back in the day, when that was all we had to work with, and was pretty much the sum total of everything we knew about disk operations on our beloved home computers (and especially if we’d upgraded from the cassette drive!), but the advantages of having access to modern day improvements are honestly completely worth sacrificing a little bit of the purity of “The Experience”. There are also the facts that real floppy disks degrade and wear out over time, and oh yeah, nobody makes them anymore! There are some who insist on forcing themselves to suffer through the full experience for the sake of nostalgia, but memories can only justify so much, and especially when our beloved little compy has been proven capable of so much more! Don’t just steep yourself in nostalgia; imagine the amazement you would have felt if you’d had access to some of these amazing inventions back then!
These days, we have the means to displace -or at least enhance- the part of our retro hobby that adds the least value to the overall experience. Technology is prolific and accessible enough that we can make our own program cartridges pretty easily, or slap a single custom cartridge in that essentially makes the entire library accessible with a few keystrokes! Heck, we can even replicate the 1541’s slow elevator experience with a Rasperry Pi instead, so at least you can keep a bit more of that authenticity without also being forced to sit there listening to your precious, expensive floppies being eroded away into oblivion for endless minutes!
One of the cartridge slot-based solutions recently drew my eye, as it presented an opportunity to try something different.
The TeensyROM, as its name implies, is based on the Teensy 4.1, one of the microcontroller OG’s. What it offers is flexibility and crazy potential for not many moneys. You can actually get one of these pre-built for a little over $50 (plus shipping, natch) or make your own from-scratch.
So what’s the big deal with it? There are a few custom cartridge “final solutions” out there already; what makes this one special?
Well, imagine your favorite game loading in just a few seconds, rather than minutes. Imagine launching almost any single launch program this way. No mounting disks and disk images, no typing load commands or wondering why you just got dropped to the Ready prompt after all the waiting. Everything just loads and goes, and you can still use a connected floppy (or virtual floppy) if you need a data disk.
There has already been a community movement to make cartridge images more widely available from formerly floppy-only releases due to the existing interest in homemade carts and other universal cartridge formats like Magic Desk. TeensyROM can work with those, so one already has huge collections of games and SID tunes ready to go in the forms of the OneLoad64 games and High Voltage SID Collection (HVSC). No need to pick and choose and search; you can just have almost ALL of them at your fingertips!
Come back here later to check out the other options too!
The tabs below will present information relevant to setting up each component, starting with the TR itself, followed by the NFC reader and Windows-based external UI project.
- TeensyROM
- //NFC
- TR-UI
Software
If you’re a hardcore DIY-er and this needs to be made from-scratch as much as possible, here are the sources of information you’ll need to get going:
TeensyROM: https://github.com/SensoriumEmbedded/TeensyROM, and the BoM and assembly instructions: https://github.com/SensoriumEmbedded/TeensyROM/blob/main/PCB/PCB_Assembly.md
Have fun!
Hardware
The rest of us with less patience, skills or equipment can shortcut things a little bit and buy some bits pre-assembled instead.

TeensyROM
Pre-assembled at the creator’s own Tindie store, currently going for $59.00USD: https://www.tindie.com/products/travissmith/teensyrom-cartridge-for-c64128/
Also available at AMI64.com, but for an additional premium at £89.00: https://www.ami64.com/product-page/teensyrom-multipurpose-cart-for-c64-c128

Micro SD card
The Teensy has a slot for storage, which is where all of the cart and prg files we intend to launch from it will be stored. You could get something bigger than 32GB, but seriously, that is probably twice what you need. You could save a few bucks and have toooons of room remaining with a 16GB card.

[OPTIONAL]: TeensyROM Case
You can print your own using the source files at https://github.com/SensoriumEmbedded/TeensyROM/tree/main/3D_Print_Case
Or, you can get one already printed up at https://ko-fi.com/s/333a50b2a5 or https://www.ami64.com/product-page/teensyrom-3d-printed-case
Personally, I prefer to use a printing service to produce my own spins on cases. The available ones are nice in a pinch, but I want more quality and flair for mine. There will be a separate article about creating, producing and assembling my own take on the TeensyROM kit here.
Software
Once you’ve got the initial firmware load in place, you’ll want to start playing with some of the things the TeensyROM can do. Feel free to plug it in and play around. Use the usage docs to get a feel for how things work, and what’s available “out of the box”.
Then, come back here. 😉
Have fun? Okay cool, now you need to know about a few things that are out there to make things even better!
To begin with, you’re going to want some content to actually work with on this thing, yeah?
Here’s a couple of big collections to get you started off right:
- OneLoad64 Collection (528MB)
- THOUSANDS of titles, converted for use in cartridges or cartridge emulators like Kung Fu Flash and of course TeensyROM! Many multi-load titles are making their way over as well.
- Download 1: Google Drive link
- Download 2: MegaDrive link
- High Voltage SID Collection (78MB)
- Easiest way to do this is to download the whole shebang in one go
- Download full: https://www.hvsc.c64.org/downloads
That will be more games and music than you’ll be able to review in quite a long while! 🙂
However, there is a drawback to having this much content all in one place like this. By itself, with its own interface, the TeensyROM will allow you to navigate and find the title you want to load, but it will not be a quick affair. Remember that the C64 only had so much space per floppy, so the idea of having literal thousands of files (let alone FOLDERS) in one place was pretty much inconceivable.
There are ways to modernize and otherwise improve the management and navigation experience though. Head back to the top and check out the other tabs!

So, you have tons and tons of games and music and apps on your TeensyROM. Unfortunately, you’ve probably discovered the hard way that a folder with hundreds of files in it takes quite a bit of time (relatively speaking) for the C64 to index and present, right?
If that doesn’t bother you too much, but you do have favorites you want to be able to access more quickly, and you still enjoy the physical aspect of managing your media, you could always use NFC tags to launch things instead.
Right, I heard the record scratch from all the way over here, so let me explain a bit:

You know NFC cards and tags? No? Do you know Amiibo, the little collectible figurines that you can tap on your Nintendo Switch to interact with your games in various ways? Those are using a technology called NFC, short for Near-Field Communication.

It’s really little more than a coil antenna connected to a teeny tiny little chip that stores a serial number or in some cases, whatever the user writes to it, up to a certain number of characters. The most basic format, like Amiibo uses, is really just a statically-set serial number that a sensor pad can read, by inducing a very small current into the antenna, and reading the resulting pulse that is sent back out.
This is the technology behind the tap-to-pay system available through your phone, or debit/credit cards.
You can get your own NFC tags, fobs or cards from just about anywhere online, and the reader pads are also readily available for cheap, so it’s pretty easy to amass your own collection.
Why would you do this? Okay, so look at it like this: all those Amiibo figures do is look neat, cost a lot, and unlock some unique character feature or item in a game when its contents are read, right? You can do the same thing with a generic tag you make yourself; the only really unique and difficult-to-replicate aspect of those figures is their character designs that gives them their collectability. That’s it. So now that you know you can use NFC tags as a kind of trigger, how cool would it be to be able to tap a card on a reader, and your computer reboots itself and automatically loads a specific program or game? Moreover, what if this happened almost instantly, any time you tapped a new card, regardless of what was already loaded and running??
That’s what TeensyROM paired with the TapTo (Zaparoo) system brings to the table. Tap a card, and (after you’ve done the basic initial setup) the cartridge will trigger a reset on the Commodore, while the Teensy’s cartridge emulator is pointed to a different specific program or game stored on a SD card. The result is a blink-and-you’ll-miss-it swapping of running programs simply by tapping a card, tag or fob on a reader!
You know what, here. See it in action for yourself, instead. You’ll get the idea quickly. 🙂
What the…
I know, right? 🙂
So the two components are theTeensyROM, and the NFC reader that lets you make your own virtual cartridges to swap between programs, connected to the TeensyROM’s USB port.
The reality is that tapping the NFC card is really doing little more than automatically selecting a crt or prg file that’s already on the TeensyROM, and then rebooting the C64 with that virtual cartridge file now being “active” as the first thing the computer sees on startup. However, it’s a cool little way to keep that sense of using physical cartridges, floppies or cassettes without the costs of increasingly-rare media and load times, and risks of losing something precious or irreplaceable with those old formats. Keep that old worn game cassette you’ve been holding all these years intact, just load the program from something else instead while you preserve the actual original media that introduced you to this world of miracles, instead.
Now, to be clear, you can actually use the TeensyROM by itself. You do NOT need the NFC reader add-on for it to be able to load cartridge files you select from its own built-in menu. However, you will still have to reach around to the cartridge to tap the reset button to back out of a program/game, or reset the Commodore manually with the power switch itself (like dad always did) or with whatever other reset mod you’ve built in. All the NFC portion does is make it easier to hold something physical in your hands and flip to a desired program more quickly because one card=one program, so once you’ve set it up and put a label on it, that card might as well be an instant-load disk itself (though no, the programs do NOT load from the card. They come from the SD card on the Teensy; the NFC tags just tell it which program to reset-and-run when tapped).
It’s just a little bit of “let’s pretend” that will undoubtedly conjure those childhood images of floppies scattered all over the desk or carpet, only now there’s no risk of dad losing his shit and paddling you good for ruining the software collection. 😀
Let’s put one together!
Sources
NFC Reader for TeensyROM: https://github.com/SensoriumEmbedded/TeensyROM/blob/main/docs/NFC_Loader.md
Hardware

NFC RFID Transciever Module
AliExpress is the place for cheap Chinese electronics, and they’ve got us covered here too.
There are a few variations of this component, but since I’m following the creator’s own recommendations here, I’m going to adhere to them as much as possible.
The site’s full description given is “PN532 V2.0 NFC RFID Wireless Module V3 User Kits Reader Writer Mode IC S50 Card PCB Attenna I2C IIC SPI HSU“. You get the transciever board for $4.97USD + shipping. They also offer a set that includes USB OTG adapters and a demo NFC fob and card for less than a buck more, but that would be a waste; we don’t need the extra bits this time.

NFC NTAG215 Cards
There are different formats for NFC cards. They define specific communication protocols and capabilities.
In our case, we want a format the allows for writing information to the card and provides enough capacity to be useful, without worrying extended features like encryption (which costs more and is totally unnecessary for our purpose here).
I opted for a set of 50 cards from Amazon, because they’re cheap! This set went for $12.99USD at the time of this writing.

Printable Vinyl Label Stock
We want to be able to make our own card labels, right? I mean yeah, you could just Sharpie something on there, but if we’re taking the time to do this, it’s worth doing right. I needed the type for laser printers, in my case. There are tooons of options for this stuff out there, if you have a different printer type or prefer a matte (or even LAZER HOLOGRAM!) finish.

Paper Corner Rounder
This one is totally a personal preference. I like to refine the final product a little with the rounded corners on the trimmed labels. Besides, the cutter is cheap and could come in handy for other projects down the road.
The DIY Bits

LABELS! Quick generation method
This is where you can get creative, or just follow the crowd.
The NFC loading aspect was developed starting from the TapTo Project (now known as Zaparoo Core). They have a web-based label maker app that lets you generate your own labels by dropping in whatever box art you want (example to the left), but customizations are a little sparse. If you like quick-n-dirty, this is the way to get them made.

LABELS! From-scratch custom method
If you’re like me though, you like to customize and personalize the heck out of anything you build. The TapTo template is okay, but it’s so self-branded that I find it a little distracting.
So instead, I made my own design!
This was created in Affinity Designer (equivalent to Adobe Illustrator).
The embossed publisher logos are a little fiddly, but I’m plugging through all the unique ones I can find. I’m considering putting together my own web app to generate labels based on this template, with the ability to edit the title label at the top and publisher logo at the bottom, as well as of course drag-n-drop box art import functionality.
Updates will be presented front-and-center if I can make that a reality.


The Card “Drive”
As was demonstrated in one of the videos above, you don’t actually have to have the card reader outside anywhere. Technically you can just mount it inside the Commodore chassis itself if you wanted to, or even just let it flop around loose on the desktop.
But where’s the fun in that?
I’m working on a 3D printed enclosure that takes the idea in a Commodore-centric direction, so it feels more like it’s supposed to be there, rather than a hacked-together add-on.
Getting Set Up

Plug the TeensyROM into your Commodore 64’s cartridge slot, plug the NFC sensor board into the TeensyROM’s USB port (the big USB-A port in back, NOT the Teensy’s own microUSB port!)

Fire up the computer. You should be dropped immediately to the default menu.

Tap f8 (shift-f7) to get the Settings menu.

Enable the NFC reader.
If you have a network connection plugged into the TeensyROM, you can also set your timezone. If you enable the Sync Time option, your Teensy will set the time based on your network! Note that this will cause a slight delay when starting up the computer though, as time sync takes a few moments, but it could be worth it if you intend to use a desktop environment like GEOS frequently!

Press <SPACE> to go back to the main screen.
Navigate to where your .crt or .prg game/program is located, (F3 to select the SD card if your target content is there) and highlight it.
Hit the <BACK ARROW> (←, or the topmost left key, where ESC is on a PC keyboard)

Select a NFC card to program, and hold it near the reader/writer pad, and hit any key
TADA! The card is now programmed with the path to that program.

Now, no matter what the computer is doing at the time, if you tap that card over the reader again, it will instantly reset and begin loading and running that program. The test program shown here, GORF, runs as instantly as any of the classic original cartridge games. Others might be conversions of larger programs and take a little time to decompress first. Those will usually present a unique “loading” screen while this is happening, and it still completes far more quickly than loading from a 1541 drive, no typing necessary!
Taking It Further
As noted in the features above, the TeensyROM is also capable of providing a MIDI interface as well, so you can connect a MIDI controller or keyboard to the USB, and use it to play music with the Cynthcart program, to start.
YouTuber Lukhash used one to connect an electric guitar for this tune:
You can also find CCGMS in the Utilities, and go exploring the many Bulletin Board Systems (BBSes) still being run out there! Yeah it’s basically telnet rather than the old-school dialup, but can we all agree that the fun of playing around on those boards back in the day had nothing to do with dealing with the downsides of old-school dialup connections? Exactly how exciting was it to connect to some well-designed BBS, wait for the awesome artwork to actually finish drawing its slow way across your screen, then for the connection to just drop before the menu got to display?? Nah, I like experiencing the Commodore nostalgia at 38,400k instead. 😀
Updates
08/22/2024: I decided to see how well my NFC “drive” enclosure design will work out in its current form. I feel like it’s pretty much finished, but now need to see how things fit together to determine if further adjustments need to be made. My 3D printer is awaiting some hardcore tuning and adjustment work, so I’ve ordered out for the prints instead. Here’s hoping for nice results!
9/14/2024: So the enclosure arrived, and while there were some design issues I need to address, the overall effect is definitely what I was looking for! Hot glue gets around the fastener placement issues, to the point that I think I can leave the screws out of the interior altogether, and just adhere to receiver board to its own little platform inside, instead.


Now, we’ve seen what TeensyROM can do, but we’ve also encountered the minor issues that arise from having ALL that content stashed right there on one little device.
Although the C64 never dreamed of something so massive as a gigabyte (let alone megabyte!) it can still access those big fields of storage thanks to the custom-coded menu systems found on these modern homebrew devices. The problem, however, is that a folder with tons of files in it still takes time and memory to read, index and present on the screen. This is the point where the 64 starts struggling a little bit. You open the “P” folder in your games directory, the TeensyROM reads the folder and presents the content to the computer, and madness ensues. You see, every character on the screen takes precious memory to store and display, and the more files there are, the more RAM is consumed for those items that are still off-screen and waiting to scroll into view.
Remember loading the directory of a floppy filled with tons of files? Remember how much longer that took than something with just a few entries in the list? That’s still happening here. Even though the TeensyROM is darned near magic on its own, everything it does still has to be presented to the 64 in a manner it expects, and that’s where things get bogged down when lots of data starts flying about.
So the best method to help eliminate that slogging and waiting through big lists -other than pruning the collection down substantially of course, but who wants to do that?- is to offload the whole navigation and selection process to something else, as well.
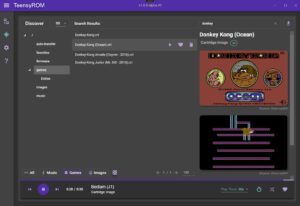
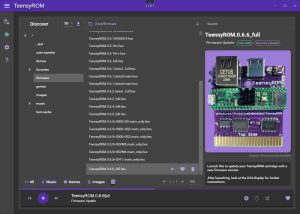
For example, if you have a spare Windows PC or laptop lurking around, you can connect it to the TR micro USB port and use the TeensyROM UI app to manage your library and instant-launch files with a simple search and click.
The app is dead simple:
- You download the latest release to a Windows computer, and unzip the folder somewhere convenient.
- Then, using a micro-USB cable, connect the PC to the USB port on the Teensy board itself (the one on the controller, not the regular, larger USB port on the back of the cartridge board).
- Power up the C64. You should hear the “USB device connected” sound from your PC as it detects the Teensy’s connection.
- Run the app (titled TeensyRom.Ui.exe) on the PC
- There is a short intro walkthrough that the application presents on the first run. It will show you around the interface and perform an indexing scan of the SD card mounted in the TeensyROM.
After the initial indexing scan is completed, the TR-UI app now has its own internal database of what’s on the cartridge, and can now let you scroll and search through the contents with all the speed and ease of any modern computer. When you’ve found what you want to launch, just double-click it, and the TeensyROM does its thing to launch the selected content.
Because of the way it needs to index the contents for “offline” searching, you need to be sure you run a new indexing pass in the UI app any time you change the TeensyROM’s contents. If you don’t the app won’t see the new stuff, though you will still be able to find and launch it directly via the TeensyROM’s interface on the 64 itself.
With this app connection working, you can also use it to automatically transfer things to the TeensyROM as well, including firmware updates! You won’t have to deal with removing the SD card and managing things separately again.
Also, since the TeensyROM is capable of providing a MIDI interface via the large USB-A port, the UI app developer is starting to experiment with DJ mixing functionality as well. Pretty sweet for a machine that the rest of the world has largely left behind! 🙂