Commodore 64 Kernalpalooza
by cmack · Published · Updated

Edited July 5, 2025
LOAD”INTRODUCTION”,8,1
The Commodore 64 doesn’t really have an operating system such as we know it today. The components that make it work and interact with the user are housed in three separate chips: the charset, BASIC, and the kernal.
The character set chip contains what we know as a font today. It provides all of the various characters and symbols used for various means of programming and display.
The BASIC chip contains, of course, the BASIC programming language. Now, the 64 doesn’t technically need BASIC to do a lot of things, but those various file operation commands you use? You know, LOAD, SAVE, OPEN, etc? Those are BASIC tokens. They are how you are able to interact with and program the computer right out of the box. Remember when you had to boot a PC with a DOS disk in the drive before you could even start using it? That’s essentially what the BASIC chip is doing for you on the 64.
The kernal is -as its misspelled name implies- is the core of the 64’s functionality. It handles processing of information coming in and going out of the system, among other things. Back in the day, what you got after you opened up the box and plugged things in was what you got. However, while changing out the kernal was not really a common process, products like JiffyDOS did introduce the concept and prove it could result in tangible improvements.

From there, things just exploded as others tried to find their own unique spin on the concept, and kicked off a kernal kustomization kraze- a kernalpalooza, if you will. A kornucopia of kode to keep you kontent. Okay I’ll stop.
Today, we can change and swap the kernal about and try out new things with a lot less wait time and semi-permanence that came with the mail order process!
We’ll go over the different levels of things that can be done, from experimenting with kernal code mods to options for swapping out the actually installed and in-use version.
Basic Kernal Modding
DIY Kernal Customization
In computing, the kernel is the code center, the heart of the machine.
Fun fact: Commodore’s core software is known as the kernal, which would, from the outside, seem to be intentionally-incorrect, perhaps to set up some kind of copyright claim? In actuality, the misspelling came about after one of the engineers made a typo, and CBM simply ran with it, naming it kernal even in the general documentation. Whether somebody thought it was accidentally creative, or they just decided to let it go after the error had already made its way through a bulk of the printed materials, the truth may be lost to time, but the fact remains that it’s just another one of those myriad quirks that we Commodore aficionados have adopted readily as well.
The kernal is in charge of operating the various aspects of the computer – it is similar to the operating system of a modern computer, but it lives entirely on a chip, on the motherboard. It primarily handles the task of interacting with the user: receiving commands, acting on them as directed, and providing feedback.
And, similar to today’s OSes, alterations and mods are possible, despite the kernal living on a one-time-writable chip, where it would seem to be nearly set in stone. Nevertheless, Commodore’s kernal can be modified to change its appearance and behavior, and though it used to be difficult to manage unless you were a skilled hardware and software geek back in the day, it’s darned near child’s play to make changes and drop it on a new chip, today.
Back in the C64’s heyday, there were commercial kernal replacements available -usually sold via advertisements in scene publications like Compute! or Compute’s Gazette- like JiffyDOS, which replaces the datasette routines with enhanced floppy drive transfer speeds, as well as a simplified command set. Originally, the altered kernal came on replacement switchable ROM chips. JiffyDOS still exists today, and licenses for the firmware –and of course pre-loaded switchable ROM chips– can be obtained online.
Though the C64 is well and truly legacy hardware at this point, ROM switchers have continued to be designed and refined, and now it’s possible to swap kernals with the flip of a switch, turn of a dial, or even tap of the Restore key! The primary interface no longer need be static, and can be customized relatively simply, while still maintaining the ability to fall back to the original experience and command set. A C64 so modified is still fully capable of being returned to original user experience whenever needed.
Now today, with technology being more accessible, understanding the kernal code becomes almost trivial, and simple things such as boot up color or welcome text can be changed, as well as core routines.
Where to start
To begin altering the kernal, you’ll need an example of the kernal as a file to start with. While we can get a copy of the kernal right from the original chip with just a little work, it’s a lot less hassle to just go download an example readily available on the internet. Also, in the event the current stock kernal ROM chip has failed, this process can provide a handy repair and replacement, while opening the door for alternatives on-the-fly.
The stock Commodore kernal is available online on zimmer.net. The most common kernal ROM is 901227-03. It was the final revision of the kernal before the Commodore 64 ended production. The most recent revision –251104-04– was meant for the Commodore SX-64, which was a slightly different animal. Almost fully compatible with the C64, but different enough that running its kernal on a C64 introduces some oddities that just get in the way of using the system as expected.
Note that some Commodore ROMs may technically still be copyrighted. CBM doesn’t exist in quite the same form that it used to, but the assets are still wholly owned, lurking in the shadows under the stewardship of a company called Cloanto (https://cloanto.com/products/). The developers of the MEGA65 -a modern take on an unreleased model- wrote a detailed post on this topic here, and another post about the issue is discussed thoroughly here as well.
Edit the file
Alteration is performed on the ROM’s binary file directly, so a hex editor is required, such as HxD. HxD opens the binary file and displays it in both hexadecimal and decoded ASCII. This is helpful to see what code may represent visible text, but also allows direct access to every individual byte of the source code in general. The code is displayed by the address spaces in which it resides. It looks like gibberish for most of the file, but if you know what to look for, lots of things can be easily located and changed to suit your preferences.

HxD is one of many hex editors available online
What to edit
Now, editing the code directly can be a little fraught and can result in the computer not working as expected, or at all. However, for the most part, any failed attempts to mod the kernal can be rolled back easily. It is possible to cause real damage if you change the wrong things, but you’d honestly need to know what you were looking at in the first place to do so. The order of everything is important so not changing the dimension of a field is important. Here’s the thing: the kernal is packed with every feature the developers could cram into the original chip’s storage space, and exists as a loooooong continuous blob of hex code, so being able to access specific routines and functions in the kernal requires knowing exactly which address space they start and end at. What this means for us is that the best way to perform a successful initial customization of the kernal is to end with the same number of characters as you started with. You can replace the word “FREE” with “FART” if you wanted to be immature (but hilarious!), but “FARTY” is right out. You could use a shorter word too, as long as you include space characters to pad it out.
There are guides to help with alterations, such as this one for modding JiffyDOS or this one about ROM patches.
Here are a few kernal changes that can be done easily and safely. Bear in mind we’ll only be looking at cosmetic changes; nothing that changes functionality of the system such as what a more in-depth product like JiffyDOS does.
Changing startup text
“Offset” is another way to refer to an “address”, and in this context, refers to the location in relation to, or offset from, the start of the ROM’s total living (address) space. Make sense? It will, I promise!
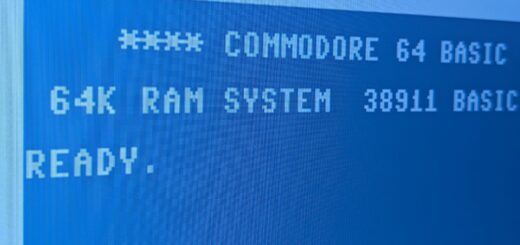
The text of the Commodore boot screen will appear in the stock ROM as plain text, and is easy to find in HxD – it can then be changed and saved. Try searching (CTRL-F) for the string “BASIC BYTES FREE”, which is in all official versions of the kernal, around offset $0461.
The first line of the screen should use offsets $0475 to $0497 (which includes the preceding empty spaces, but not the ones following the text)

Location of the welcome message in the stock kernal
The texts “BASIC BYTES FREE” and “64K RAM SYSTEM” (plus their spacing) are also alterable.
In fact, the whole section from the spaces to the 64K RAM SYSTEM (with spaces) are a whole single string (where 20 represents spaces and #0D represents returns) and can be altered as a block – add or remove lines, change text, etc. After this string, the number of bytes available will be printed by the kernal, then the string BASIC BYTES FREE (which starts by a space) which can be changed too.

The whole welcome message is a single string inside the kernal – 20 are spaces, $0D are carriage returns/newlines.
There are other interesting strings that could be altered as long as their length is respected, such as SEARCHING FOR or ERROR.
You can experiment most effectively by copying out the string as shown selected above, paste it into Notepad, then experiment with your chosen modifications until you’ve achieved an exact string length match.
Changing startup screen colors
One of the most popular kernal changes is the startup color scheme. Want to make the Commodore look like old DOS prompt? You could set the text to be green over black background, instead of light blue on dark blue. Prefer the border to be black too? Maybe something a little more eclectic? This is just data within the kernal; as long as the right values in the right place make sense to the rest of the routines at-large, you can make changes that have predictable results this way.
In the stock kernal, there is a unique string which should be around offset $CD9- “0E0601020304” – the 0E (offset $0CD9) is the border color (light blue) and 06 (offset $0CDA) the background color (blue) – these can be changed to any of the accepted stock Commodore colors as follows:
………….. 00 = BLACK
………….. 01 = WHITE
………….. 02 = RED
………….. 03 = CYAN
………….. 04 = PURPLE
………….. 05 = GREEN
………….. 06 = BLUE
………….. 07 = YELLOW
………….. 08 = ORANGE
………….. 09 = BROWN
………….. 0A = PINK
………….. 0B = DK GREY
………….. 0C = GREY
………….. 0D = LT GREEN
………….. 0E = LT BLUE
………….. 0F = LT GREY

Location of the border and background color in the stock kernal
Changing text color
The text color can also be changed – looking for this unique string “8C02A90E” which would be around offset $0532- the 0E (offset $0535) is for text color (light blue) and can be altered.

Location of the TEXT color in the stock kernal
Beware! if the text and background colors are the same, text will be unreadable.
You can also change the READY. prompt
The READY text is not part of the kernal, but the BASIC ROM, which can also be altered.
We can view this message is in the BASIC binary by searching READY and the prompt is located at offset $0378.

Location of the READY. prompt in the BASIC ROM
The prompt message can be changed like other texts. It is just an output set of characters and the kernal doesn’t really care what the text is, as long as the length is the same, including the punctuation in “READY.” – these 6 characters can be changed to any other string.

Result of changing the READY. prompt
In theory other BASIC response/error messages can also be changed without altering the functionality. However, beware that changing actual tokens in the BASIC ROM, such as “PRINT” or “GOTO” will definitely cause some collateral damage, so don’t mess around too much with those unless you’re ready to depart almost completely from compatibility with all other existing Commodore software.
Advanced features?
Something interesting would be to remove the de facto loading location of the LOAD action commanded by shift-RUN/STOP, which is the tape drive (device=1) on the stock kernal.
LOAD from disk using a different kernal
The SX64 kernal ROM which was made for the portable luggable version of the Commodore 64 –the SX-64, Commodore Executive 64, or Commodore VIP-64 depending on where it was sold. Its high price point and low actual portability kept it from seeing anything like the success of the C64.
While the computer was a “portable” version of the Commodore 64, the datassette port and all its loading routines were removed. Much of the kernal was similar to the full C64, and the file can be used in a standard C64 if a datasette isn’t going to be used.
The binary kernal ROM file 251104-04 is available here.
It is possible to revert the text and color scheme of the SX-64 kernal back to the usual C64 one but keep the load-on-floppy (or pi1541) with the shift-RUN/STOP key combo.
That being said, there is an issue with the SX64 (or most any kernals) implementation of the shift-RUN/STOP routine – it pushes the command as
LOAD”:*”,8
Which loads the very first program on the disk device 8, traditionally the first floppy drive. However, it does not ensure the memory location where it is loaded to. A much better command would add a ,1 parameter for those programs where specific memory address is needed. Fear not – this can be altered in the kernal file. Even if the new load command is technically too long for the space it has available in the kernal binary.
There are basic command abbreviations that uses PETSCII to make commands shorter. They are usually 2 characters, turning LOAD’s 4 char count to only 2, leaving 2 characters for the extra ,1.
PETSCII is literally using the lower-case character map of the ASCII table – when editing the binary file, one could simply write the ASCII lower-case and that would become the corresponding letter’s PETSCII in the Commodore world.
Therefore, locating the LOAD command in the SX64 kernal binary and changing it with
Lo”:*”,8,1
would in theory push the correct (shortened) command to the BASIC interpreter. This is found at offsets $10D8 to $10E1

Location of the LOAD call in the SX64 kernal
When implemented, hitting shift-RUN/STOP results in the following

Load shortcut with ,8,1 arguments
What if you want to use both the floppy drive and tape drive?
One of the main issues with using JiffyDOS or SX64 as a base kernal to implement a change in the LOAD routine, is that the datasette routines are butchered to make room for new content. Remember, the code storage space is really cramped for these systems. While this may be advisable on machines without a cassette port, it does block some nice modern features such as Tapuino, the arduino tape emulator.
Being that LOAD and RUN are both read as a single string by the kernal, one could sacrifice the auto-RETURN and the RUN in favor of having an auto-fill load string – there’s just enough space for that without going into much trouble altering the inner routines of the kernal. On the base kernal file, the complete load sequence is located around at offset $0CE7

Complete load sequence for Shift-RUN/STOP on stock kernal
Changing it to
Lo”*”,8,1
would in effect remove the #0D (Enter) and the RUN + #0D (auto run) – this would still give an interesting auto-fill command for loading programs.

Altered load sequence with stock kernal, removes auto-Enter and auto-run
At this point, it is up to the user to hit [ENTER].
While less automation, still more useful than the plain LOAD for cases using floppy drive, without removing the actual datasette routines.

auto-fill with shift-RUN/STOP (no Enter)
To load on tape, simply type LOAD [ENTER]
Testing
To actually put these alterations to use, we need to burn the images to a physical chip to use in the computer. Burning ROM chips is its own fun process, but sometimes it is nice to test ahead of the whole pull-the-chip-to-reburn process. That’s where we can turn to VICE – the Versatile Commodore Emulator – which uses the exact same binary files as burnt on the ROM chips. From the VICE folder, the /C64/kernal file is the kernal ROM, and can be used for a quicker iteration time. This kernal file is literally the stock C64 binary kernal ROM, so you can replace VICE’s instance with your own customized one, and boot it up for instant testing.
See the end result by running VICE with the altered kernal and BASIC ROMs.

Running custom kernal and BASIC in the VICE emulator
Issues with diagnostics
Something to keep in mind is that the C64 Diagnostic Cart with full harness is likely to declare a bad PLA or bad CIA because of the different ROMs. Anyone who RTFM about what the diagnostic is actually doing when testing CIAs and PLA will understand that the stock ROM checksums are used for those tests. If you’re running different ROMs from stock, then the checksums will be different, so… I guess just expect weirdness with self-test programs if you’re not running all the stock things when you test.

C64 diagnostic REV586220++ – bad PLA declared because of custom Character ROM – Note that the custom kernal is declared as Unknown.
For full diagnostic to report correctly, it is best to have the stock set of ROMs installed when running the tests. That is why ROM switchers may become handy.

Simulated DOS on commodore 64, made with altered kernal/basic
Other cool mods
-One cool Kernal mod ideas is an autoboot: loads the first program available on disk. Useful for BBSes. This removes the datasette routines (like most kernal mods)
-On the other end of the spectrum, there is a TurboTape kernal that removes RS232 in favor of TurboTape datasette speeder, and head alignment.
The sky is the limit, but depending on your experience, changing the look and some basic functionality might be the most you can manage on your own. There are, however, more thorough kernal mods that introduce useful features like fastloading, usually in tandem with a similar swap being done on the floppy drive as well.
This is all well and good when playing around in an emulator like VICE, but what if you have an actual C64 you want to try these mods out in?
For that, you’ll need to learn a little bit about how to make your own ROM chips, but don’t worry; it’s quite simple once you understand a few simple rules. Check out the next tab for details!
Kernal Chip Swaps
Kernal Chip Swaps
When you power up your Commodore computer, there’s a complex dance of things happening to ensure the system is ready to go. Then, the base components needed to present an interface and accept inputs from you are loaded up, before the system finally presents that screen we all know and love.
Back in the day before the internet, eBay, Amazon and Ali Express, getting the components and software necessary to hack and modify the Commodore was a challenge. It was the sort of thing you picked up while interacting with fellow hardcore Commodore geeks, or maybe you knew a guy who knew a gal who had a hand in developing for the platform. It was nearly a thing of magic when somebody came out with a modified kernel that addressed the shortcomings of the 1541 floppy drive, one which came on a pair of custom-burned chips and a toggle switch (so you could flip back to the stock kernel for those programs that couldn’t load under JiffyDOS for whatever reason).
Nowadays, it’s a simple matter to learn a little about the inner workings of the computer, and source your own bits to not only replace the kernal, but modify it to make it your own, too! And not just the kernal, either. The character and BASIC ROMs can also be changed in interesting ways, some more deeply than others, depending on how familiar and comfortable you are with the code that comprises these things.
Dump the existing ROM to a simple 8k bin file (or more likely just download a dump, open it up in a hex editor, make some edits in the appropriate spots, snatch up a compatible EEPROM and programmer, and burn baby burn!
It’s extremely approachable these days, and once you grasp the concept, you’ll probably be looking to personalize a copy for yourself. A lot of people already have, and put them up online to share.
Now, there is a limit to what you can pull off. Like I said, the whole “operating system” is a measly 8k of code: just enough to get all the hardware working as intended, and making the advertised features available. The thing is, 8k is all the system is willing to look at, so for the really big customizations, something has to go to make room for them. That’s why many fastloader variants just chuck the datasette routines out the window, though of course there are other variants that focus on expanding the tape controls and do away with floppy-related stuff, too. How’d you like to just be able to type “LOAD” and the system assumes you’re entering LOAD”*”,8,1 instead? No more of that “PRESS PLAY ON TAPE” nonsense! 🙂
Okay, so now that you’re drooling, how does it work? Well first, of course, you’re going to need your replacement chip. The stock kernal ROM in the Commodore is not re-writable (it’s a PROM; but you need an EPROM or EEPROM). The difference between the two is that one is erased with a high intensity light, usually a UV lamp, before it can be written to again. The other can be wiped electrically (Electrically Erasable Programmable Read-Only Memory) by the programmer device. EEPROMs are far more common and convenient, but if you’re already knee-deep in the world of legacy micro-electronics, you may have an old-school EPROM laying around already. Each variant comes in different sizes, from 8k up to 512k, and availability can be challenging for the smaller ones.
Oh, and there are three variants of EEPROMS too. These are DIP: the classic oblong chip with metal legs sticking out of it, PLCC: a smaller, square package with its legs wrapped around the edges around each side, and SMD: with teensy tiny little legs designed to sit flat against pads on the circuit board.


All of the available E/EEPROMs will require some kind of adapter, either because they have more than the 24 pins of the stock Commodore sockets, or of course because they’re a completely different form factor. Thankfully, there are projects out there for each of them; it’ll be up to you which one suits your expectations best.
The one you want will depend very much on how you expect to use it. If you want to swap ROMs quick and easy and often, you will probably want a solution that doesn’t require you to open the chassis and flip switches or jumpers around.
For that, there are two options:
- A SMD-based option that uses a couple of additional internal connections to let you switch the ROM simply by holding down RESTORE on the keyboard. You can get one of these little chunks of magic as a DIY project or pre-built too! The downside to this solution is that you can’t easily change the EEPROM contents without building a converter board or de-soldering the SMD from the assembly so it can be written on the programmer, and you’re limited to 4 slots.
- A ROM switcher that uses an additional controller (usually Arduino) to give you an on-screen menu or even a separate physical control to handle the switching.
There is a PLCC solution that will let you switch the ROM with a little dial switch or jumpers built onto the board, and popping the chip out of the assembly and snapping it into an adapter that comes with the programmer. Getting replacement PLCC EEPROMS is a bit of a challenge and can be expensive. I mean, you can get them fairly cheap by the handful on Ali Express or eBay, but what you’re getting will be of dubious quality, and in some cases, outright re-badged fakes that aren’t even what they claim on the label.
DIP chips are more accessible, cheap, easier to handle, and usually use DIP switches, jumpers or physical switches soldered to the board to change the ROM to be loaded.
The PLCC project offers a simpler rotary surface-mount switch for selecting up to 8 kernals(!!) The downside? There are relatively few sources for a pre-built unit, they are all outside of the US (so shipping is slower and more expensive), and the project is not open-source, so it’s not easy to make your own. Ami64 has them, as does MyRetroStore. Ami64 will ship to the US, MyRetroStore will not. These were apparently made by a creator who goes by cece-mods, but now sells as CeceTechTools (Etsy) and again, still does not ship to the US. There is no main store that I could find, other than the resellers. Should I take one of mine apart and adapt it to use a SMD or DIP chip instead?
Of course, there are also some interesting cartridge-based options that make the whole affair almost plug-and-play with custom on-screen menus and everything. These are really cool, but also really expensive too, if you’re only wanting to swap the kernal. However, those devices have such a broad range of functionality that the asking price for them is actually quite fair.

Me. I’m going with the PLCC option because I bought one a while back, before I realized I’d hop between kernals more frequently. Initially, I had thought to drop in JiffyDOS and use that with my Pi1541, but again, some programs just don’t like it, and then when I discovered the TeensyROM, suddenly I didn’t even need to bother with speeding up disk load times at all. Now, I’m just looking for a cheap means to customize my kernal and leave it, taking advantage of the ability to modify the kernal, BASIC and character ROMs so I can do something truly unique with my Commodore 64, and yet still be able to fall back to the stock state whenever I need to.
What You Need
If you decided on one of the SMD “RESTORE key” mods, the installation and use process is usually quite simple, and they have solid instructions that arrive with them, as well. TheRetroChannel does a fantastic job describing (and selling!) these. You can get more info on those directly on his YouTube channel as well.
Hardware
EEPROM

Now that you’ve chosen your EEPROM solution, be it DIP or PLCC, it shouldn’t make much difference if you have the necessary adapters for your programmer.
Speaking of which…
Programmer

Now you need the programmer. There are a few ways to address this, but the most accessible (and affordable) way is to pick up a T48/TL866 programmer kit from Amazon. Yeah it’s a bit pricey, but it’s a tool that can come in handy for other projects down the road, and this kit comes with adapter to house the PLCC chip I’m working with, and an extractor tool too.
There are also ways to make your own programmer, such as with an Arduino, but that is the slow and difficult road unless you have a great deal of in-depth microelectronics know-how, in which case you’re not sitting here reading this, right? 🙂
Software
Programmer Software

These programmers work very well, but they are very, very Asian, to the point where getting the software to work with them will make the security-conscious among us break out in hives just trying to find a trustworthy installer, because they don’t provide solid documentation with the device itself; you’re expected to go hunting around the internet manually for it.
Their downloads portal page is here. If you are not in China, the actual downloads are hosted here (Mediafire). You want the Xgpro setup rar file.
If you’re getting the heebie-jeebies not having a local verified vendor offering this content, feel free to get the v12.9 installer archived (released 5/7/2025) with us instead. The local archived version has been transferred to a zip file, rather than the original rar format. This was to make it easier for users to access, as well as helping ensure there weren’t some scummy bugs trying to sneak in.
Hex Editor

You will need the means to open and edit binary files. These are not as simple as text files, but some programs can make opening and editing them just as trivial. One of my personal favorite hex editors is HxD. You can download it free from here.
Version 2.5.0.0 is also archived on this site, English language only (because I’m a data hoarder who really hates it when a site vanishes and takes an important resource with it).
Note: You don’t technically need a separate hex editor if you’re not making any complex changes, because the Xgpro programmer app above will let you review and edit binary file content as well. In fact, you can use it to review and save the content of existing chips.
KERNALS!

Now, time to snag some kernal code to play with! Actually, if you have that 8-in-1 PLCC ROM, you’ve technically already got some, but why spend the time dumping and separating the contents of the chip when you can just download your own so much more quickly?
If you know what you’re doing with the hex code, then go nuts! Dream up a modification and make it happen cap’n! For the rest of us, here’s a walkthrough on some of the useful things you can change to suit your tastes and needs.
What to Change
If you have a good understanding of what you’re looking at, you can introduce or modify your own takes on actual kernal functionality, but honestly most of the really good and useful stuff has been done already. The point is that with these hardware components, you can easily run with an existing project, modify it a bit to make it your own, and drop that thing in place like it was always there. If you opt for one of the multi-ROM options, you can easily switch out for something different without having to swap the physical chips.
Also, you aren’t limited to swapping the kernal, either. You can also change the character set as well. Yep, you can change the font itself! Hey, shut up this was almost unheard of back in the day! Finally, you can also use modified versions of BASIC. Now that one can be a little fraught if you’re going to be running existing apps, but really cool if you have an idea for a program of your own that could take advantage of the modded and enhanced command set that an alternate BASIC version can provide.
The Fine Points
Now, you’ll need to remain aware of these binary file sizes, depending on your goal. If it’s about the kernals, those are 8kb each, and the switches on the projects above will be geared toward switching between focusing on 8kb windows of the total burned code. The problem with this is that if you want to use the concept for swapping character sets, those are only 4kb. There’s an easy way around the confusion that creates though. It will become clear what I mean in a moment
When you’re assembling your ROMs for burning, you want to do your edits to them (if any) first. Then you will make one big chunk of each of them to be burned to the chip as a single bundle.
In Windows, this is done with a simple command in the command prompt:
copy /b “kernal1.rom” + “kernal2.rom” + “kernal3.bin” + “kernal4.bin” assembled.bin
See how that works? You’re copying each of the ROMs (or BINs; they’re interchangeable for the most part, depending on where you got your sources), in order in binary mode (that /b switch), and outputting a single file called “assembled.bin”. The code for the kernal is exactly 8kb, so when it’s all done, you’ll have one big file where the end of the first kernal butts right up against the beginning of the next, but that switch on the board exposes one 8kb window of that code at a time, so as long as each kernal begins and ends in a predictable place in the final bundle, it will totally just work.


BUT, character sets are half of the size of a kernal, so if your switch exposes 8kb at a time, what do? The answer is deceptively simple: double up the ducks in the row! The command would look like:
copy /b “charset1.bin” + “charset1.bin” + “charset2,bin” + “charset2.bin” + “charset3.bin” + “charset3.bin” assembled..bin
You see, our ROM switcher projects only switch in 8kb increments. When it goes to load the character set, the Commodore is only going to take a 4kb mouthful of the code. It doesn’t matter if the same character set is repeated immediately afterward; it’ll be completely ignored. That second 4kb chunk could be filled with lorem ipsum; it simply doesn’t matter, because the only reason we need that second 4kb chunk is to ensure the next character set chunk starts where it’s expected to. So if each character set is repeated twice per switch “window”, the end result will turn out to be one character set accessed per switch (or jumper) position.
The way the Commodore’s architecture works relies on things being arranged in deference to the hardware’s expectations. There are no “files” with a beginning and end on those chips like text files on a thumb drive; the code is just one long string, but as long as all the expected elements are there in the order expected, it will just work in the end.
So that’s how you can make your Commodore 64 do things it never could have done out of the box!
One last point: if you’re making multiple variation ROM bundles, maybe make sure the first item in each bundle is the original, untouched version? That way you can roll back to stock configuration easily if you need to.
Burning It Down
So now you’ve got your modded ROMs assembled and ready to go, now it’s time to get them burned on the chips.

For my 8-in-1 board, because the rotary switch only exposes 8kb windows at a time, and because of the way the board re-routes a couple of the chip legs to conform to the Commodore’s expectations, we cannot actually reprogram the PLCC while it’s mounted on that board, so it needs to come off the C64 mainboard, first.
We will need to extract the chip, using the funky extractor tool that came with the programmer. You’ll see little notches in the corner of the chip’s socket where you can insert the extractor prongs. Those prongs are hooked, and are meant to hook underneath the PLCC chip itself, while squeezing the extractor arms will cause the body of it to push against the PLCC socket, creating a levering force to help the extraction. Shuffle the prongs down into those slots, then squeeze the extractor just a little bit to start putting upward pressure on the chip. Don’t squeeze like you’re trying to break a walnut; things can go pear-shaped fast if you use too much force. Instead, just put a little pressure on it, then wiggle it like you would a pair of tweezers to gently shuffle the PLCC chip out of its socket.


Now that the chip is out, pay close attention to its markings. Orientation matters, and you’ll want to make sure it’s installed on the programming adapter in the right orientation. Look for the notch on the chip that indicates the top edge. Orient this to align with the special indicator notch on the PLCC socket, which should be at top left. Line the chip up over the socket, and with it sitting on top of the contacts, push it home gently. It may take a little nudging, but it will go in if you ensure it’s lined up properly first.


Once it’s in the socket, we can now mount the whole adapter into the programmer device, ensuring it’s sitting in the topmost slots, before locking it in place.


Now, connect the programmer to your computer via the USB A-B (printer-type) cable, then launch the programming application. I use XGPro, which you can get from a handy Github archive, rather than flailing about the manufacturer’s (sketchy) native language site.

In XGPro, you’ll first need to select the programmer device you’re working with
Then, you will need to select the proper chip so it knows what it should be looking for when it comes time to actually communicate with your EEPROM. Click in the box under “Select IC”, near the top of the screen, and select “WINBOND” under the Manufacturers panel (yeah I know it reads “Manufactory”, it’s still obvious what they intended), then locate and select “W27C512 @PLCC32”.
Naturally, if you have a different variant, then be sure to choose the correct one. More often than not, it makes a big difference with these things.

Now, click the little green-outlined button called “READ”, and in the window that pops up, click the Read button near the bottom. You should see confirmation of successful communication and reading of your chip!

So, at this point, you now have a full “dump” of the current contents of your chip. If this chip is new to you, maybe export this and save it for later, just in case? It’s not like it’s that big. 😀 Click on Back in the Read window, then you can go to to SAVE, give the file a name and a place to store it.

Now, click on LOAD, and navigate to where your assembled kernal bundle is stored.
If you spent enough time rummaging around the hex editor previously, you might recognize the opening bytes of your first kernal variant.

Now, click on the PROG. button in the top menu bar, and then click the Program button in the Chip Program dialog that just opened.
Wait a few moments and watch the progress bar as those bytes get laid down on the chip all smooth and organized-like. When it’s done, the program will emit a high-pitched chirp/beep. I don’t know why they insist on deafening their users like that, but do beware it’s a thing with this program.

When it’s all done, you can close the program and disconnect the programming device from your computer.
Now reverse the chip movement process, to mount it back on the switcher board you pulled it from originally.
Drop it back in the Commodore’s mainboard and select one of the alternate kernal slots.
Plug it all back in and fire it up. SWEET!

Small admission here: the kernal alteration I made only affects the first line of text, and the background/border/text colors. Replacing “READY.” with “RDY />” is done by modifying the BASIC ROM, and the apparent font change was done using an alternate character ROM. In my longboard C64, that’s essentially swapping out three dedicated chips for changeable ROMs.
Now What?
Well, have some fun with it! You can now build and swap out code to make the system entirely your own.
However, you are NOT relegated to opening the case every time you want to make a change. There is a way to do this without all the unplugging of cords and loosening of screws every time, and without resorting to buying a Final Cartridge III!
Multi-Kernal Mods
Multi-kernal mods
So, we went through the process of editing the Commodore 64 ROMs, as well as how to get something new in place when you want to check something else out. We’ve also seen you can do similar swaps with the character set and even the BASIC installation too!
BUT. there are aspects to the process that just annoy the heck out of the engineer in me, and that’s the part where I have to turn everything off, unplug all the bits, then take out the case screws so I can open it up, swap out chips, fumble around with a teensy little dial, or manipulate a set of jumpers to make changes. Plus, after all that, there’s always the likelihood that I’m not going to boot up the thing I was looking for, because I forgot which thing was in which slot on the chip.

Oh, right, yeah. Lemme just put down a sticky note somewhere with the details on it. Like a luddite. Like a technology heathen. Back in the day, This Was The Way, because we honestly didn’t have anything more convenient and simple than little notes stuck on the monitor.
AND -and this really chaps my ass- I broke… BROKE one of the hinge tabs on the top half of my precious breadboard’s case because of all the opening and closing! :'( Yeah, I know it’s a thing nowadays since they’re just getting older and the plastic more brittle, but still, I don’t like broken bits, and especially ones that could have been avoided.
Well, now that I’ve figured out how to avoid any further damage, time to just buckle down and make a new thing so this becomes an issue of the past.
We’re gonna make a ROM switcher.
Oh, right, crickets and pins dropping everywhere now, because yeah, there’s like a bunch of solutions to do this out there already, right? BUT, how many of those let you run more than 4 kernal options?
Who the what now?
So, if you’re here, you are likely already aware of the current options running around the web for sale. Most of them are switchless switchers, intercepting the RESTORE keypresses and allowing the user to cycle through 4 possible kernal options through flashing of the power LED.
These are evolutions of older designs, which used larger, older EEPROM chips for storage. Nowadays the focus seems to be more on compact size and ease of use, at the expense of ease of reprogramming ease and capacity.
However, there are some fringe designs out there that simply aren’t well known, because they’re not talked about that much, and aren’t sold in easy-to-access venues (if at all).
The thing is, if you can get a hold of the sources and decipher the process to get it built and working, you can actually have a lot more flexibility and capability. I mean, yeah, most people aren’t really going to have use for more than 2 or 3 alternate kernals for the most part anyway, but it would still be nice to be able to have tons of options on the board, kernals, crts and prgs too, huh?
There are a few big projects I’m interested in trying out, and am in the process of assembling sources for. They are:
Software Defined Retro ROM
UPDATED:
One ROM

- Up to 8 kernal ROMs
- Can replace all three ROM slots
- Programmable in situ (no need to remove from the board)
This little fella is now known as One ROM, and it’s available for a lot more than just the C64, but the version we want in this case is the Fire 24.
Programmable via USB-C port, in situ. Lots of incredible options available now, more coming!
I ordered one of these, and will be doing a write-up on it next soonest opportunity!
This just came out, and is intended to be a semi-universal replacement for failed chips in Commodore PET, VIC-20 and 64 systems.
The ability to program without needing a chip burner and switch banks for multiple ROMs are sweet bonuses, and it all sits in the same footprint as a 4-in-1 switchless ROM, but with all the benefits of the other devices with greater storage capacities!
The developer is already looking into some further options, such as a single device to replace all three ROM slots at once (like the RepROM-64 below does), as well as reprogramming capability via wifi!
https://github.com/piersfinlayson/software-defined-retro-rom/?tab=readme-ov-file
RepROM-64: Triple ROM replacement, one chip for all three

- Capacity: Designed for 4 kernal, 4 charset and 2 BASIC ROMs, all switchable with a single power/ground switch channel for each.
- Control: While the project was designed to be controlled with simple switches, this is actually the device that the 64-Control project was originally designed to manipulate.
The original version featured through-hole components for ease of building, and had smaller storage. The project was forked afterward to tighten up the design with surface-mount (SMD) components. A third generation design is being worked on for C64C (shortboard) versions only, which is even more compact.
Original release: https://github.com/hbekel/reprom64
Project site: http://henning-liebenau.de/reprom64/
No longer made and sold by the developer, the source files are all right there, ready to go. The downsides with this one are that the GAL chip is difficult to find, possibly difficult to program (though not so hard if you’re already prepared to handle that EEPROM), and the storage capacity is limited (for now).
MagicFlash64 (EZ-kernal) : On-screen menu, 64 slots, PRG and CRT support


- Capacity: 4Mbit (enough for 64 8KB slots)
- Control: On-screen menu via customized kernal adapted for the purpose
- Can also run PRG and CRT programs stored in available slots (these are allowed to “spill over” into following slots if they are larger than 8KB)
The original version featured through-hole components for ease of building, and had smaller storage. The project was forked afterward to tighten up the design with surface-mount (SMD) components. A third generation design is being worked on for C64C (shortboard) versions only, which is even more compact.
Original release: https://github.com/zschunky/magicFlash64
SMD version: https://github.com/r1me/magicFlash64
Forum initial announcement: https://www.forum64.de/index.php?thread/87120-vorstellung-projekt-magicflash64/&pageNo=1
Last information I found on this device indicated that it had been all but abandoned due to quirks with the design preventing it from being completely reliable between various mainboard revisions.
OSD-Multikernal : On-screen menu, 16 slots (though 32 should be available)


Uses a 256k OTP EPROM and ATTiny84a to provide access to up to 15 alternate kernels, utilizing a “main” modified kernal that presents a selection menu.
The kernals live on a one-time programmable EPROM of 256k, and the menu of those kernal names lives on the ATTiny controller. The menu interface kernal loads, then presents the menu, the contents of which are pulled direct from the Tiny’s own itty-bitty storage.
The thing with this one is that the EPROM is a bit of an odd choice, in that it’s only burnable one time, like the C64’s stock ROM chips, and that even though the chip is 256k, which has space for (and in fact does contain 32 kernals when burned as directed), only 16 slots are accessible for some reason.
The source files for the project are here, but the developer kind of stopped messing with it and moved on to other shiny things… The dev’s FB page is here.
I’m trying to determine why this limitation exists, and if there might not be a more modern flash-based EEPROM option available, instead. I mean, technically a Winbond W27C512 will work here, but that’s limited to 8 slots, and if I can figure out why the current design is limited, perhaps even extend the storage and access capability.
I get it: there’s probably very little call for having FIFTEEN different “OS” versions available on the C64, but go big or go home, amiright? Besides, if I can work out how the switching system actually works, I might be able to create a design that handles all three ROM slots from a single board, using a single big ole chunk of storage from which the controller can pull and offer up to the mainboard at boot time.
MeGALoROM : On-screen menu, 64 slots, PRG and CRT support


- Capacity: 15 kernal slots
- Control: OLED and rotary encoder
This is kind of an expansion to C64-Control, which was an Arduino Nano with OLED and rotary encoder, switching a kernal switcher board.
Forum initial announcement: https://www.forum64.de/index.php?thread/112467-megalorom-kernel-umschalter-f%C3%BCr-c64-passend-zum-megalodos/&pageNo=1
What attracted me to this one was that it took the C64-Control idea and doubled it up, so the code and control methods are the same, but there are two EEPROM chips for storage now.
Unfortunately, while this device was intended as an add-on for the MeGALoDOS floppy drive expansion, yet can still operate standalone, both are apparently only available by emailing megalodos@th-linke.de, after which he’ll send a spreadsheet with prices, and then you can order individually. So there’s no way to build or get one cheaper; it’s only sold on-demand, not open source, and not through a retail front where you have some form of protection. 🙁
Not to cast aspersions on the developer here, but the old guy selling-from-the-basement business model -archaic spreadsheets and all- is kind of unnerving to see still in use. Of course, there’s also the problem where all this is posted on the internet, so if somebody, you know, NOT in Germany wanted one, all those crappy cost differences start coming into play due to tariffs, shipping costs and materials availability.
Feel free to email Tommy at the address above if interested, pricing is still a mystery because nobody that bought one from him ever shared the information in any way.
Personally, I’m honestly just turned off by the archaic methods and lack of clarity and transparency. I had to dig for 9 pages on the forum just to find that email link. Lots of golly gee-whiz over the miracle of technology and who made it, but almost Prohibition levels of silence about how to actually get one, which really, in my book, just screams “not worth the hassle”. Total shame too.
That said, I did stumble across the board design, so I might be able to reverse-engineer the thing and open it up to the world with my own twist on it!
SuperKernal 36-in-1

Source: https://www.forum64.de/index.php?thread/76953-superkernal-36-in-1-wlan
Source: https://www.forum64.de/index.php?board/412-superkernal-36-in-1-wlan/
https://www.lemon64.com/forum/viewtopic.php?t=66749&start=15
- Capacity: 36 kernal/crt/prg slots
- Control: keyboard/on-screen display
This seems to have been left behind in favor of the (far more limited) switchless ROM switcher solutions, but no clue why. This had wifi capability for transferring ROMs to the device via FTP, and the only way to get it was through mail-order from Germany.
I’d love if they could just go ahead and open source the thing, but that never seems to happen with these projects based in certain places. They pop up, generate tons of interest and sell some units via mail-order (UGH), then sell off remaining inventory to eBay etc before dropping the whole thing like a hot potato. Never releasing the designs or code, just making it one more curiosity that only a select few can ever enjoy.
Trinity Switcher
This one is going to be pretty sweet when it’s done.
The concept is simple: switch all THREE ROM chips from an external controller. It’s not as compact and clean a solution as the others above, but this uses components that are readily available NOW, and can be built NOW without relying on finicky SMD components and closed-source coding practices.
Each of the ROMs will have 8 options to choose from for kernal, charset and BASIC (though good luck finding 8 compatible versions of Commodore BASIC for the 64!) 😀
Here is a concept image for an enclosure I’m working on for the device, which will also embed the RGB2HDMI module I’m using on my system.

I’ll have a dedicated write-up for this one when it’s ready! 🙂
UPDATE:
Technology being what it is today, a new development has come up that makes this whole project completely redundant and archaic, by comparison. The OneROM project (above) is the endgame I would have reached for myself, had I the knowledge and experience to pull it off.
As such, as cool as it would have been to bring Trinity Switcher into reality, the fact of the matter is that it would have represented a large investment in time, materials, assembly and troubleshooting, just to have an external device that switches ROMs on the fly, when OneROM is now doing it all completely internally. The only external component I need to worry about is maybe an extension of the USB port so I can hook it up without opening the computer every time.
Kernal ROMs Library
Here are the ROMs we’ve got to play with. Information is sparse (or outright non-existent) for many of them, but wherever useful information can be found, it is brought here for archival backup, or at least linked-to. A few may have references, but no downloads, either because one has not been located, or it is still commercially active, such as is the case with JiffyDOS. Each has been spun up and at least viewed in VICE for some beauty shots, which I feel has been lacking with most other collections I’ve found around the Web.
All ROMs will have as much documentation about them as I can find through scouring web forums and legacy storefronts (bless you, Web Archive!) and good old fashioned Google searches. As English is my own primary language, where I find manuals and supporting information only in other languages, I’ll link to that original information, then translate and correct it to the best of my ability for storage here, also linked with the ROM it addresses. Where documentation is found in scanned original format only, I’ll also try to translate those to textual, searchable format for more easy consumption in today’s digital world.
I feel it bears mentioning here that I do not intend to step on toes by archiving information and ROM code here. I’m only trying to collect and curate as complete a collection as possible, so it’s easiest to approach for even the casually curious. I won’t offer copies of code still being actively sold and supported (such as JiffyDOS), so If there’s a reasonable objection to any item’s presence here, please don’t hesitate to let me know and I’ll remove the content causing concern.
The kernal ROMs will fall into four primary groups:
- Stock
- Various versions and languages as developed and released by Commodore Business Machines (CBM).
- Fastloaders (parallel)
- Accelerating disk operations through the use of modified kernals and dedicated specialty hardware. Usually also include some useful key- and DOS shortcuts.
- Fastloaders (serial)
- Accelerating disk operations through modified kernals only, also usually have those handy shortcuts in one form or another.
- Vanity / Convenience
- Takes an existing release -stock or otherwise, hence all the “clones”- and makes minor changes, usually in the boot color scheme and initial starting text, but doesn’t offer any functional changes otherwise.
- There could be many reasons for any particular individual clone to exist, but none found so far are actively malicious or anything. They’re the same train car underneath, they just have different graffiti on the outside. 😀 The advent of more modern computers made comparing these different kernals much easier, and therefore the process of ferreting out the turnkeys from the version they came from far more trivial.
The clones will be presented underneath the kernal they were originally sourced from (where known), prefaced with underscores (“____”) to make them stand out better.
If you know something about one of the ROMs I don’t have documented, or even have a ROM dump I can add to the library here, let me know!
A general comparison of the different fastloaders can be found here.
Now, on with the showcase!
* NOTE: I do not claim to be an expert on these. It’s not an exaggeration to define the history behind some of them as quite murky or even lost to time altogether. I’m working out the wrinkles and details as I go, so some of their descriptions could be wrong. I’m perfectly happy to be corrected because that will only make this effort more accurate, so let me know if you have conflicting or additional info with something I have listed here!
- BASIC
- Kernals
- Charsets
[ Commodore Stock: 901226-01 ]
Creator: Commodore Business Machines
Note: The standard Commodore BASIC v2 found on all C64s, presented here for restoration purposes if needed, but the only realistic way to expand on or modify BASIC is with a “wedge” or add-on loaded after boot, such as Simon’s BASIC. So, you can change some words to make it unique, but you can’t really change the core keywords/commands without introducing some possible snarls with running programs.
[ Commodore Stock: C64GS BASIC ]
Creator: Commodore Business Machines
Note: Pretty certain this is the same BASIC as is present on the standard C64s, since the GS was meant to be an exclusive gaming console (no keyboard or accessory ports), so it stands to reason there’d be little reason to deviate from the existing standard yet.
It’s assumed this might have changed had the GS actually gained serious traction, but it didn’t, so we’ll probably never know.
Just in case, this system’s BASIC version is zipped up alongside its kernal in the STOCK kernals section.
STOCK
Name | Notes | Screenshots |
The original first version. Kind of rare, not found on many stock machines still running in the wild. | ||
More common, 2nd most deployed version. | ||
The Big One. Most common, most deployed version, found on most C64's sold during the system's height of popularity. | ||
Japanese variant, most useful for systems actually in use by someone familiar with the language (works best with the stock JP charset too) | ||
The Swedish variant, again most useful to somebody most comfortable with the language. There is a matching Swedish charset as well. | ||
Another Swedish variant, the differences with the other one are not clear yet. | ||
For the ill-fated attempt to compete with Apple in the classrooms, this kernal was meant for the PET64, which was basically a C64 in a PET chassis with a monochrome screen. (https://www.zimmers.net/cbmpics/ced64s.html |  | |
Stock BASIC and Kernal ROMs intended for use in the C64GS. Not of much use on other hardware, since this system was pretty much a Commodore Atari, meant to support a cartridge and joysticks. The end. |  |
EXOS AND CLONES – 64 ONLY
These are a ROM patch that introduce some additional disk commands and achieve some improvements in load speeds -usually with simple actions like blanking the screen- but the effects don’t extend to other ops like SAVE, NEW or VERIFY.
NAME | NOTES | SCREENSHOT |
EXOS v1 (No link available) | NOTE: This was a ROM patch, similar to TurboDOS. It seems to be the precursor to what is known as the 64'er kernal, as EXOS was released in 64'er magazine (12/1986). Some further investigation into this possibility is being performed. |  |
CREATOR: J. Schemmel, Markt+Technik Verlag ? NOTE: Released as a ROM patch in a magazine, much like Compute!'s TurboDOS. | | |
NOTE: EXOS v1 clone | | |
CREATOR: J. Schemmel |  | |
CREATOR: J. Schemmel, Markt+Technik Verlag ? | | |
CREATOR: ?? (originated in Yugoslavia) NOTE: EXOS v3 clone, the only update from the original is in the boot message, and that's it. |  | |
[ DOCS ] |  |
SPEEDDOS AND CLONES – HARDWARE REQUIRED
These achieve enhanced disk transfers using permanent mod installations, composed of ROM chip replacements on both C64 and 1541 sides, custom cables, and interface cards connected to the C64 userport. The fast disk ops don’t work without the dedicated hardware, which will either need to be purchased secondhand, or built from documentation and reverse-engineering efforts.


NAME | NOTES | SCREENSHOT |
CREATOR: NOTE: |  | |
Looks like a simple boot text edit of SpeedDOS |  | |
 | ||
 | ||
SpeedDOS clone (only startup changed) |  | |
SpeedDOS clone (only startup changed) |  | |
SpeedDOS Expert clone |  | |
SpeedDOS Expert clone |  | |
SpeedDOS Expert clone |  | |
 | ||
 | ||
 | ||
| ||
 | ||
SpeedDOS v1 clone |  | |
SpeedDOS v1 clone |  |
HARDWARE REQUIRED
Same as SpeedDOS and friends above, these require dedicated interface hardware to work as designed, though the C64 kernal will still at least offer DOS shortcuts and other enhancements.


NAME | NOTES | SCREENSHOT |
CREATOR: Very little information found about this kernal, possibly origin of EXOS? |  | |
CREATOR: |  | |
CREATOR: |  | |
CREATOR: |  | |
CREATOR: |  | |
CREATOR: |  | |
CREATOR: |  | |
CREATOR: |  | |
CREATOR: Jann Datentechnik/REX Data Technology Hardware has been reverse-engineered and replicated; you can make it yourself! There is also a legacy project that may be a similar effort, now only available via Wayback Machine or downloadable right from us. |  | |
CREATOR: |  | |
CREATOR: |  | |
CREATOR: |  |
ROMs Only (no additional cables/carts needed)
Even though many actually had hardware components, ROMs in this category will work without any additional hardware (beyond C64 and 1541 kernal swaps) to achieve respectable disk speed improvements over the stock IEC (serial) connection. Most also have f-key and DOS command shortcuts as well. JiffyDOS resides in this category.
NAME | NOTES | SCREENSHOT |
CREATOR: Markt+Technik Verlag ? | 
| |
CREATOR: Markt+Technik Verlag ? NOTE: ROM patch with some speedloader routines, similar to TurboDOS. Came from EXOS. | 
| |

| ||
No info, will need to deep-dive this one for capbilities | 
| |

| ||
|
| ||
CREATOR: Delta Electronics | 
| |

| ||

| ||
|
| ||

| ||
NOTE: Very scant info, perhaps a unique BASIC extension. | 
| |

| ||
JiffyDOS (2F79984C) | [ COMMANDS ] | 
|
NOTE: JiffyDOS patcher that adds SD2IEC support and provides customization options during the patching process. Valid (licensed ) JiffyDOS kernal ROM for C64 required. | 
| |
NOTE: JiffyDOS patcher that adds the convenience of DolphinDOS to the flexibility of JiffyDOS (licensed JiffyDOS rom required) | 
| |

| ||
____S-JiffyDOS | [ SITE ] | 
|

| ||

| ||
[ SITE ] | 
| |

| ||
|
| ||
EXOS clone | 
| |
[ SITE ] | 
| |
|
| ||
|
| ||
|
| ||
|
| ||
|
| ||
CREATOR: REX-HAGEN | 
| |

| ||

| ||
CREATOR: Haensch and scientific market | 
| |
[ SITE ] | 
| |
[ SITE ] | 
| |

| ||

| ||
[ SITE ] | 
| |
Did not boot | ||

| ||
Did not boot in stock, will need to research issue | ||

| ||

| ||
This may not be an actual kernal rom, but rather an attempt to integrate a software-only fastloader that was released in Compute!/Compute!'s Gazette magazines. | ||
Did not boot in stock, will need to research issue | ||
Did not boot in stock, will need to research issue |
UNKNOWN OR UNCLASSIFIABLE
While looking for information on the others, I would sometimes encounter references to other kernal ROMs I didn’t have documented yet. These are the ones that haven’t been linked with something else, or are still just generally strangers in the mist.
Name | Notes | Screenshots |
NOTES: This seems to be a Speeddos 85'er clone, hacked to save memory under I/O (code at $e000) but doesn't work in any emulator, just loops on reading $dd00 | ||
Perhaps a precursor to ProfessionalDOS, or maybe a later variant, as Mikrotronic was the company that originally sold the mod, but then another company called VTS did their own take on it... It's still a little vague on this one at present. |  | |
No information found anywhere on the internet with this one, but it's frequently included in the multi-kernal ROM kits available for purchase here and there. Wedge command reference is found here. |  |
Most of the interesting (and complete) charset replacements were found at https://github.com/patrickmollohan/c64-fonts. These can be installed with an alternate EPROM/EEPROM in the C64 charset ROM chip slot, much like the multi-kernal switchers that are out there now.
C64 Default – 901225-01 – UK/US
Creator: CBM


Creator: CBM


C64 Default – 906143-02 – [JP]
Creator: CBM


C64 Default – 325018-02 – Swedish
Creator: CBM
Creator: Patrick Mollohan
Note: Inspired by Peter Jackson’s Lord of the Rings and Hobbit trilogies. Includes upper and lowercase letters, numbers, and symbols


Creator: Patrick Mollohan
Note: Apple II/II+ font ported to the Commodore 64. Includes upper and lowercase letters, numbers, and symbols.


Creator: Patrick Mollohan
Note: Custom font for the C64 based on Aurebesh, the main writing system depicted in Star Wars. Includes upper and lowercase letters (based on Legends rules), numbers, and symbols.


Creator: Patrick Mollohan
Note: Either you love it or you hate it, there is no in-between. Comic Sans on the Commodore 64. Includes upper and lowercase letters, numbers, and symbols.


Creator: Patrick Mollohan
Note: Hachicro, a simplistic outline font. Includes upper and lowercase letters, numbers, and symbols.


Creator: Patrick Mollohan
Note: A calligraphic font for the Commodore 64. Includes upper and lowercase letters, numbers, and symbols. Found on Zimmers.net.


Creator: Patrick Mollohan
Note: The in-game font extracted from Kirby and the Forgotten Land. Includes letters (uppercase only), numbers, and symbols.


Creator: Patrick Mollohan
Note: A pixel-accurate port of the in-game font of Minecraft. Includes upper and lowercase letters, numbers, and symbols.


Creator: Patrick Mollohan
Note: The font, as found on the ZX Spectrum, ported to the Commodore 64. Includes upper and lowercase letters, numbers, and symbols.